Or try one of the following: 詹姆斯.com, adult swim, Afterdawn, Ajaxian, Andy Budd, Ask a Ninja, AtomEnabled.org, BBC News, BBC Arabic, BBC China, BBC Russia, Brent Simmons, Channel Frederator, CNN, Digg, Diggnation, Flickr, Google News, Google Video, Harvard Law, Hebrew Language, InfoWorld, iTunes, Japanese Language, Korean Language, mir.aculo.us, Movie Trailers, Newspond, Nick Bradbury, OK/Cancel, OS News, Phil Ringnalda, Photoshop Videocast, reddit, Romanian Language, Russian Language, Ryan Parman, Traditional Chinese Language, Technorati, Tim Bray, TUAW, TVgasm, UNEASYsilence, Web 2.0 Show, Windows Vista Blog, XKCD, Yahoo! News, You Tube, Zeldman
TypeScript takes aim at truthy and nullish bugs | InfoWorld
Technology insight for the enterpriseTypeScript takes aim at truthy and nullish bugs 26 Jul 2024, 11:18 pm
Microsoft has released a beta of TypeScript 5.6, an update to the strongly typed JavaScript variant that disallows nullish and truthy checks on syntax that never varies on nullishness or truthiness.
The TypeScript 5.6 beta, which follows last month’s production release of TypeScript 5.5, was announced July 26. TypeScript 5.6 can be accessed through NuGet or through NPM by running the npm install -D typescript@beta command.
For disallowed nullish and truthy checks, the compiler now errors when it can syntactically determine that a truthy or nullish check will always evaluate in a specific way. Microsoft said “many, many bugs” could be caught this way. Some expressions still are allowed even if truthy or nullish. Specifically, true, false, 0, and 1 are all still allowed despite always being truthy or falsy.
TypeScript 5.6 also introduces a native or built-in iterable type called BuiltinIterator. It is defined as follows:
interface BuiltinIterator {
// …
}
TypeScript 5.6 also introduces a new intrinsic type called BuiltinIteratorReturn and a new --strict mode flag called --strictBuiltinIteratorReturn. Whenever BuiltinIterator types are used in places like lib.d.ts, they are always written with a BuiltinIteratorReturn type for TReturn.
Other new features and improvements in TypeScript 5.6:
- A new compiler option is introduced,
--noCheck, which allows developers to skip type checking for all input files. This avoids unnecessary type checking when performing semantic analysis necessary for emitting output files. - TypeScript 5.6 introduces a new feature called region-prioritized diagnostics or region-prioritized checking. Instead of just requesting diagnostics for a set of files, editors now can provide a relevant region of a given file. The idea is that this will typically be the region of the file that is currently visible to a user.
- Previously, computed properties marked with
overridedid not correctly check for the existence of a base class member. Similarly, if developers usednoImplicitOverride, they would not get an error if they forgot to add anoverridemodifier to a computed property. TypeScript 5.6 now correctly checks computed properties in both cases.
The case for multicloud: Lessons from the CrowdStrike outage 26 Jul 2024, 11:30 am
A July 18 software update from CrowdStrike caused a massive IT outage, leading to chaos across airports, banks, stock exchanges, hospitals, and more. This incident, marked by widespread occurrences of the “blue screen of death” (BSOD), highlighted the vulnerability of relying on a single cloud provider.
Most of us know someone affected by this outage, although systems are returning to normal as I write this article. Flights were canceled, banks could not make deposits, and patients could not get hospital treatment. That’s scary post-apocalypse stuff. This outage was not the result of a malicious act, but it proves we’re not ready to face a substantial cyberattack and the far-reaching damage it could cause.
The disruption of services worldwide showcased the significant risk of single-provider dependency and underscored the crucial need for enterprises to reconsider their cloud strategies. Namely, how can we make sure this doesn’t happen again? It’s the most common question I’m receiving right now, and it’s easy to answer: It’s time to move toward multicloud computing.
Benefits of a multicloud strategy
Let’s look at the top four reasons to consider multicloud.
Distributing workloads ensures that if one provider experiences a failure, the entire operation will not be affected. This distributed approach enhances business continuity and reduces downtime.
Vendor lock-in is a big risk of relying on a single cloud provider, making enterprises vulnerable to the provider’s changes in service, pricing, or capability. A multicloud strategy offers flexibility and negotiation power, allowing enterprises to adapt more readily to changing circumstances.
Different cloud providers offer unique strengths, and enterprises can optimize their overall performance by using each provider’s specific advantages, such as superior data analytics from one and advanced storage solutions from another. This best-of-breed aspect is the primary reason enterprises should leverage multicloud. You can’t build the best, most optimized solution with only a single provider.
Layered security measures across platforms minimize the risk of a single point of failure. This setup can also better contain threats by isolating compromised systems.
The risks and costs of multicloud
Many businesses adopt a multicloud approach without fully understanding the potential risks and costs. Now that we understand the key benefits of multicloud let’s explore some of its less appealing aspects.
Managing multiple cloud environments can be complex, requiring specialized knowledge and robust management tools. Integrating various platforms can lead to challenges in maintaining a cohesive IT environment. Monitoring, troubleshooting, and maintaining multiple environments requires more resources than a single cloud setup.
Each cloud provider has its own security protocols. Ensuring consistent security practices across multiple platforms takes time and effort to avoid gaps in security coverage.
Differences in cloud platforms can cause interoperability issues. Applications and data must flow seamlessly across providers, but varying standards and APIs can create barriers.
Different jurisdictions may have varying compliance requirements. Ensuring compliance across multiple providers can be challenging and time-consuming.
Handling relationships with multiple vendors requires more effort in contract management, communication, and service-level agreements (SLAs). This can strain resources and complicate negotiations. Managing multiple subscriptions and licenses can lead to higher overall expenses. Additionally, egress fees or other unexpected charges must be factored in when moving data between clouds.
The initial setup and integration may be expensive. To facilitate the transition, enterprises might need to invest in new tools, staff training, and consulting services.
Staff will need training to manage and use multiple cloud platforms effectively. Investing in skill development is costly but crucial for successfully deploying and maintaining a multicloud environment.
The implementation of multicloud
Multicloud isn’t a magical cure for all that could go wrong. It’s an architectural option with good and bad aspects. The recent outage or something like it will likely drive many enterprises to multicloud for the wrong reasons. We saw this during the pandemic when many new customers rushed to public cloud providers for the wrong reasons. Today, we’re still fixing the fallout from those impetuous decisions.
Enterprises should thoroughly assess their workloads and identify their critical applications before they implement a multicloud strategy. Selecting appropriate cloud providers based on their strengths and services is essential. You must manage multiclouds as a collection of integrated systems. Today, many enterprises view multicloud as a collection of silos. The silo approach will fail, either right away or eventually. Treating multicloud as a collection of systems will require more attention to detail, which translates into more upfront time and money to get the plan right the first time. It’s still the best route because doing it the second time is usually twice as expensive.
Integration tools can help seamlessly manage operations across platforms, and robust security protocols should be developed for all chosen cloud services. Lastly, regular testing and monitoring can ensure resilience and efficiency.
The CrowdStrike incident is a poignant reminder of the risks inherent in relying on a single provider. By transitioning to a multicloud strategy, most enterprises can build a more resilient, flexible, and secure IT environment, safeguarding against future disruptions. Just do your homework first.
Python pick: Shiny for Python—now with chat 26 Jul 2024, 11:00 am
As we wrap up the month in Python and elsewhere: Make generative AI chatbots in Python the Shiny way; use Streamlit to create web-based Python apps without getting dirty with HTML, CSS, or JavaScript; discover Extism, the lib that lets you build universal software components in WebAssembly; and get tips for speeding things up when Python seems too slow.
Top picks for Python readers on InfoWorld
Shiny for Python adds chat component for generative AI chatbots
“Ooh, shiny!” indeed—use the LLM back end of your choice to spin up chatbots with ease.
Intro to Streamlit: Web-based Python data apps made easy
Who wouldn’t want to write snazzy HTML (and CSS, and JavaScript) front ends without touching a line of HTML (or CSS, or JavaScript)?
Intro to Extism: A WebAssembly library for extendable apps and plugins
Write software extensions once in WebAssembly and use them in the language of your choice, anywhere and everywhere you like.
10 tips for speeding up Python programs
Never let them tell you Python’s too slow for the job! (Sometimes, it just needs a little push.)
Python updates elsewhere
Mypy 1.11 release has support for generics
One of Python’s top static type-checking tools now supports Python 3.12’s generics syntax, and tons more.
Get the most out of Python’s free-threading (no-GIL) build
Get detailed rundowns on how to build and use the new version of Python that allows true CPU parallelism in threading. Library compatibility is a significant issue we’ll all need to watch going forward.
The latest entry in the Python compiler sweepstakes … LPython
Yes, it’s another ahead-of-time compiler for Python. This one features multiple back ends (Python to Fortran, really?!). It’s in early stages but worth a try if you’re feeling adventurous.
Dotenvx: A better dotenv, from dotenv’s own creators
Do dotenv for just about any language, environment, or platform: Python, JavaScript, TypeScript, Rust, Java, Docker … did dotenv just eat the world?
BMC report examines DataOps practices 26 Jul 2024, 10:30 am
Systematic data management investment and effort is associated with outsized returns on data-driven initiatives, according to a newly released report on DataOps from BMC Software. Further, large amounts of organizational data frequently remain underutilized for insights due to challenges with active data management, the report states.
Released July 24, the report, titled “Putting the ‘Ops’ in DataOps: Success factors for operationalizing data,” was based on research examining organizational data management and DataOps practices. The report found there is no “one-size-fits-all approach” to data-driven practices, and that variables such as business size, geography, data management maturity, DataOps maturity, centralization or decentralization of data management and data delivery functions, and strategy to incorporate AI and machine learning into data management all influence how an organization chooses to refine its technology and processes in data-related pursuits.
Generally, both higher data management maturity and higher DataOps maturity tend to link to higher reported rates of success or adoption in other data-driven activities. For example, 75% of organizations with more mature DataOps practices report having a chief data officer, versus only 54% of those with less-mature DataOps practices. BMC defines DataOps as the application of more agile and automated approaches to data management to support data-driven business outcomes.
The BMC report also found that smaller organizations, with 5,000 employees or fewer, as well as those less mature in their DataOps practices, are more likely to report a pure DIY methodology where they build all relevant AI models in-house to support data management initiatives. Larger organizations and those that are more mature in DataOps practices are more likely to report a blended approach where they leverage in-house developed models alongside commercially purchased, AI-enabled technology.
BMC commissioned 451 Research to conduct the survey in late-2023, sourcing insights from 1,100 IT, data, and business professionals from large enterprises in global regions across industries in 11 countries. Other findings in the “Putting the ‘Ops’ in DataOps” report:
- Larger organizations and European organizations lead in active data management to support adoption of emergent technologies, such as generative AI.
- DataOps responsibilities are typically distributed.
- Large proportions of organizational data frequently remain underutilized for insights, often due to challenges with ongoing or active data management.
- The most obstructive challenges in the initiative to continually provide high-quality data for consumption include data quality, deployment and pipeline orchestration.
- A lack of automation, stemming from both technical and cultural challenges, is a common pain point in the effort to consistently deliver data to relevant stakeholders.
- Prescriptive and predictive analytics initiatives are driving enterprise data consumption today and are projected to increase.
Rust 1.80 adds lazy types 25 Jul 2024, 9:38 pm
Rust 1.80, the latest version of the popular memory-safe programming language, has been released, featuring “lazy” types to delay initialization of data until their first access.
Rust 1.80 was unveiled on July 25. Developers with a previous version of Rust installed via rustup can update to version 1.80 by running $ rustup update stable.
The new lazy types LazyCell and LazyLock, which delay initialization of values until first access, are similar to the OnceCell and OnceLock types stabilized in Rust 1.70, but with the initialization function included in the cell. This completes the stabilization of functionality adopted into the standard library from lazy_static and once_cell crates. LazyLock is the thread-safe option, suitable for places like static values. LazyCell lacks thread synchronization, so does not implement Sync, which is needed for static, but can still be used in thread_local! statics, the Rust team said.
Also in Rust 1.80, ranged patterns now can use exclusive endpoints, written a..b or ..b similar to the Range and RangeTo expression types. Exclusive ranges had been implemented as an unstable feature in Rust. The blocking concern was that they might add confusion and increase the chance of off-by-one errors in patterns, the Rust team said. With Rust 1.80, exhaustiveness checking has been enhanced to better detect gaps in pattern matching, and new lints non_contiguous_range_endpoints and overlapping_range_endpoints will help detect cases where developers might want to switch exclusive patterns to inclusive, or vice versa.
In Rust 1.79 rustc stabilized a --check-cfg flag. Now Cargo 1.80 is enabling these checks for all cfg names and values that it knows (in addition to the well known names and values from rustc). This includes feature names from Cargo.toml as well as new cargo::rustc-check-cfg output from build scripts.
Rust 1.80 also stabilizes numerous APIs.
Mistral AI unveils Mistral Large 2 amid rising AI competition 25 Jul 2024, 12:42 pm
Mistral AI has launched a 123-billion-parameter large language model (LLM) called Mistral Large 2 (ML2), strengthening its position as a significant competitor to OpenAI, Anthropic, and Meta.
In a statement, the company said that ML2 has a 128k context window and support for dozens of languages including French, German, Spanish, Arabic, Chinese, Japanese, and Korean. It also supports over 80 coding languages, including Python, Java, C, C++, JavaScript, and Bash.
The announcement follows Meta’s unveiling of the Llama 3.1 family of LLMs, which includes its most advanced model, 405B. Meta claims its models also feature a 128K context length and support eight languages.
Last week, OpenAI released GPT-4o mini, its most affordable small AI model.
Mistral AI said that benchmarking shows ML2 performs on par with leading models such as GPT-4o, Claude 3 Opus, and Llama 3 405B in areas like coding and reasoning. On the popular benchmarking test MMLU, ML2 achieved an 84% score, while Llama 3.1 405B scored 88.6% and GPT-4o scored 88.7%. GPT-4o mini scored 82%.
Mistral AI models are available on Vertex AI, Azure AI Studio, Amazon Bedrock, and IBM watsonx.ai, the company said.
Key attractions for enterprises
Analysts point out that the AI battle has shifted to conversational and multimodal models, each striving to excel in complex mathematics, advanced reasoning, and efficient code generation.
According to Neil Shah, partner and co-founder at Counterpoint Research, key AI players like Mistral AI are focusing on minimizing hallucinations, enhancing reasoning capabilities, and optimizing the performance-to-size ratio of their models.
“This is where Mistral Large 2 excels in terms of packing more performance per size, requiring just 246GB of memory at full 16-bit precision during training,” Shah said. “Mistral Large 2’s smaller footprint compared to the competition, while maintaining higher precision, is advantageous for enterprises. It allows them to produce more accurate and concise contextual responses faster than other larger models, which require more memory and computing.”
Moreover, enterprises heavily dependent on Java, TypeScript, or C++ will benefit from the superior code-generation performance and accuracy that Mistral’s benchmarks claim, Shah added.
Open-source models like Mistral’s can also enable users to create specialized LLMs tailored for specific industries or locations, according to Faisal Kawoosa, chief analyst at Techarc.
“Eventually, these kinds of specialized LLMs will emerge over time,” Kawoosa said. “While generative AI is useful, in many cases, a specialized understanding of the domain is necessary, which can only come from creating such LLMs. Therefore, it is crucial to have an open-source platform that not only provides LLMs to use AI models but also allows for tweaking and further development to create those very specific platforms.”
Charlie Dai, VP and principal analyst at Forrester, also noted that Mistral LLM-2’s advanced features in code generation, mathematics, reasoning, performance, and cost efficiency — designed to run efficiently on a single H100 node — along with its multilingual support and availability on major cloud platforms, will significantly enhance its competitiveness for enterprise clients in their AI initiatives.
Licensing and other concerns
A potential concern for users is that Mistral is releasing ML2 under the Mistral Research License, allowing usage and modification only for research and non-commercial purposes. For commercial use that requires self-deployment, users must obtain a separate Mistral Commercial License from the company.
“Since Mistral AI must have incurred significant data and training costs for Large 2, they have rightly reduced the scope for commercial usage without a license, requiring a strict commercial license, which drives up the pricing and could be an inhibitor,” Shah said. “This may be a deal breaker in certain areas like emerging markets.” Prabhu Ram, VP of Industry Research Group at Cybermedia Research, added that while Mistral AI has shown promise and potential, certain concerns persist. These include data transparency, model interpretability, and the risk of bias, which remain critical areas for improvement.
Build and manage LLM prompts with Prompty 25 Jul 2024, 11:00 am
One of the problems with building generative AI into your applications is there’s no standard way of managing prompts. Too often, each team that builds AI into their code takes a different approach and manages data in different ways. They’re reinventing the wheel again and again, failing to learn from other teams and other projects.
Building a new AI interaction model for each application and having different ways of storing, using, and updating prompts wastes time. AI developer resources are limited, and experienced developers are stretched across multiple projects. It’s not effective to have to remember how each application works and how they need to structure and test prompts.
Using different AI models adds complexity. A team may be using a large language model (LLM) like Open AI’s GPT, Facebook’s Llama, Anthropic’s Claude, or a custom tool based on an open source model from Hugging Face. Perhaps they decided to build an application that uses a local small language model, such as Microsoft’s Phi.
Introducing Prompty
What’s needed is a model-agnostic way of working with LLMs that allows us to experiment with them inside our development tools so we can use them without context switching. That’s where the Microsoft-sponsored Prompty project comes in. It’s a Visual Studio Code extension that helps solve many of the issues involved with working with LLMs and other generative AI tools.
You can find Prompty on GitHub, where it’s an active open source project. You can contribute code or make requests from the development team. If you prefer to start writing code, Prompty is available in the Visual Studio Code marketplace and integrates with its file system and code editor. Documentation is on the project website, and although a little thin at present, it is more than enough to get you started.
Prompty is a very straightforward tool. Its easy-to-understand format takes its cue from familiar configuration languages like YAML. The approach makes sense, as what we’re doing with prompts is configuring a generative AI. A prompt can be thought of as a way of defining the semantic space that the model searches to deliver its answers.
At the heart of Prompty is a domain-specific language that describes interactions with a generative AI. This is embedded in a Visual Studio Code extension that takes advantage of features like its language server for formatting and linting, highlighting errors and offering code completion. There’s support for both Python and C# output as well, with future versions targeting JavaScript and TypeScript.
If you weren’t drilling down into the Build 2024 session content, you may have missed an interesting session on using Prompty as part of your AI development platform.
Building prompts with Prompty
Working with Prompty in your code is no different than working with any other library. Alongside the Visual Studio Code extension, you’ll need to create an application framework that contains the appropriate packages. Once you have an application skeleton with access to an LLM endpoint, you can use the Prompty extension to add a prompt asset to your code. Inside the Visual Studio Code explorer, right-click on the root folder for your application and create a new Prompty. This will add a .prompty file to the folder, which you can rename as necessary.
Open the .prompty file to start building a prompt asset. This is a formatted document containing two sections: a detailed description of the application you are building with details of the model being used and any parameters that need to be used by your application, as well as samples of any information being based to the model. The second section contains the base system prompt to define the type of output you’re expecting. That’s followed by the context, information supplied by a user or an application that is using the LLM for a natural language output.
Usefully, you can use Prompty to test your prompts and display the output in the Visual Studio Code’s output pane. This lets you refine the behavior your LLM output will use, for example, switching between an informal, chatty output to one that’s more formal. You will need to provide appropriate environment variables, including any authentication tokens. As always, it is good practice to hold these in a separate file so you don’t inadvertently expose them.
Using Prompty with an LM orchestrator
Once you’ve written and tested your prompts, you can export the prompt asset data and use it with your choice of LLM orchestrator, including both Prompt Flow in Azure AI Studio and Semantic Kernel for building stand-alone AI-powered agents. This approach allows you to use a Prompty prompt as the basis of a retrieval-augmented generation (RAG)-powered application, reducing the risks of incorrect outputs by adding grounding data and using your prompt to produce a natural language interface to external data sources.
The resulting functions use the Prompty prompt description to build the interaction with the LLM, which you can wrap in an asynchronous operation. The result is an AI application with very little code beyond assembling user inputs and displaying LLM outputs. Much of the heavy lifting is handled by tools like Semantic Kernel, and by separating the prompt definition from your application, it’s possible to update LLM interactions outside of an application, using the .prompty asset file.
Including Prompty assets in your application is as simple as choosing the orchestrator and automatically generating the code snippets to include the prompt in your application. Only a limited number of orchestrators are supported at present, but this is an open source project, so you can submit additional code generators to support alternative application development toolchains.
That last point is particularly important: Prompty is currently focused on building prompts for cloud-hosted LLMs, but we’re in a shift from large models to smaller, more focused tools, such as Microsoft’s Phi Silica, which are designed to run on neural processing units on personal and edge hardware, and even on phones.
If we’re to deliver edge AI applications, tools like Prompty should be part of our toolchains, and they need to work with local endpoints, generating API calls for common SDKs. It will be interesting to see if Microsoft extends Prompty to work with the Phi Silica classes it has promised to deliver in the Windows App SDK as part of the Copilot Runtime. This would give .Net and C++ developers the necessary tools to manage local prompts as well as those that target the cloud.
Growing the AI toolchain
Tools like this are an important part of an AI application development toolchain, as they allow people with different skill sets to collaborate. Here, prompt engineers get a tool to build and manage the prompts needed to deliver coherent AI applications in a way that allows application developers to use them in their code. Visual Studio Code lets us assemble extensions into a coherent toolchain; this approach may well be better than having a single AI development environment.
If you’re tuning models, you can use the Windows AI Toolkit. If you’re building prompts, then Prompty is for you, while developers can use the tools for their choice of orchestrator alongside the Windows App SDK and their choice of C+ or C++ tooling. Visual Studio Code lets you pick and choose the extensions you need for a project, and architects can build and manage appropriate development environments with appropriate toolchains, using Microsoft’s Dev Box virtual machines or GitHub Codespaces.
Prompty is a big part of delivering a more mature approach to LLM application development. By documenting your prompts while testing and debugging them outside your code, you’re able to build applications and prompts in parallel, helping prompt engineers and application developers collaborate more effectively, much like front-end technologies such as Figma can power similar collaborations with designers on the web.
Visual Studio Code Java extension backs JDK 23 25 Jul 2024, 12:39 am
Oracle has updated its Java development extension for Microsoft’s Visual Studio Code editor, with the extension supporting early-access builds of the planned JDK 23 release of Java. The extension also adds the ability to manage dependencies in projects that do not require a build tool.
Available in the Visual Studio Marketplace, the latest Java platform extension for Visual Studio Code was announced July 24. Support for JDK 23 means the extension backs the next version of Java, due September 17, which includes a third preview of structured concurrency. The extension also can manage dependencies sans a build tool, which helps projects that do not use the Maven or Gradle build tools. Added support for Markdown in JavaDoc documentation allows developers to focus on content, rather than formatting, and makes it easier to maintain and read documentation directly within code. The extension overall is positioned to provide full-featured development support for VS Code.
Why Meta’s Llama 3.1 is a boon for enterprises and a bane for other LLM vendors 24 Jul 2024, 9:32 pm
Meta’s newly unveiled Llama 3.1 family of large language models (LLMs), which includes a 405 billion parameter model as well as 70 billion parameter and 8 billion parameter variants, is a boon for enterprises and a bane for proprietary LLM vendors, analysts and experts say.
“While at one end the open weights of the updated models and Llama 3.1 will provide an option for enterprises to shun and reduce their usage of closed proprietary LLMs, at the other end these models will disrupt companies or vendors building and selling LLMs,” said Tobias Zwingmann, managing partner at AI prototyping service platform Rapyd.AI.
How will Llama 3.1 help enterprises and developers?
The advantages of the Llama 3.1 family of models for enterprises and developers reside in its open weights and its performance efficiency in benchmark tests compared to closed proprietary LLMs, such as OpenAI’s GPT-4o and Google’s Gemma 2, according to analysts.
“Providing a language model with open weights empowers businesses to build custom AI solutions for their use cases without garnering hefty licensing fees from using proprietary models. While enterprises benefit from cost savings and increased flexibility, developers can accelerate innovation by leveraging a solid foundation,” said Paul Nashawaty, principal analyst at The Futurum Group.
IDC research vice president Arnal Dayaratna said that enterprises could fine-tune an open model from the Llama 3.1 family using their own proprietary data without concerns that their data and intellectual property will be shared with another vendor.
“This will also enable enterprises and developers to avoid vendor lock-in,” Dayaratna added.
The release of the larger 405 billion parameter model, according to chief analyst Bradley Shimmin, is even more significant for enterprises as they can now have access to a free LLM that matches the performance efficiency or intelligence of models, such as GPT-4, Gemini, and Claude.
Meta in a blog post said that the larger 405B Llama 3.1 model outperformed models such as Nemotron-4 340B Instruct, GPT-4, and Claude 3.5 Sonnet in benchmark tests such as MMLU, MATH, GSM8K, and ARC Challenge. Its performance was close to GPT-4o in these tests as well. For context, GPT-4o scored 88.7 in the MMLU benchmark and Llama 3.1 405B scored 88.6.
MMLU, MATH, GSM8K, and ARC Challenge are benchmarks that test LLMs in the areas of general intelligence, mathematics, and reasoning.
The smaller Llama 3.1 models of 8B and 70B, which have been updated with larger context windows and support for multiple languages, also performed better or close to proprietary LLMs in the same benchmark tests, Meta said in the blog post.
Earlier in April, Meta released the previous versions of its Llama 3 8B and Llama 3 70B models, which boasted architectural improvements over Llama 2 and improved techniques, such as a standard decoder-only transformer architecture, grouped query attention (GQA), as well as a higher-quality training data set.
Llama 3.1’s larger 405B variant, according to Anton McGonnell, product leader at generative AI platform provider SambaNova Systems, can offer better accuracy for general purpose tasks and this will allow enterprises to further accelerate improvements in both employee and customer use cases.
“We expect to see developers use techniques like speculative decoding, where less complex models handle the bulk of processing, and then call upon the larger model to verify work and correct errors when needed,” McGonnell said, adding that this could be an efficient way to run AI models as it opens new avenues for optimizing computing resources and speeds up responses in real-time applications.
Additionally, IDC’s Dayaratna pointed out that the Llama 3.1 405B model can perform synthetic data generation as well as model distillation, meaning the transfer of knowledge from a larger model to a smaller one.
These capabilities enable enterprises to run additional analytic workstreams, Dayaratna added.
Is Llama 3.1 too expensive to deploy for enterprises?
While Llama 3.1 is relatively more intelligent than its predecessors, deploying the model may be too expensive for small and medium enterprises, analysts believe.
The Llama 3.1 405B variant is extremely expensive to run due to requiring two Nvidia H100 servers (16 GPUs) to run the unmodified model, Dylan Patel, chief analyst at semiconductor research firm SemiAnalysis said. Patel noted that this is much more expensive than past models, which fit on a single lower-end GPU (Llama 8B) or two high-end GPUs (Llama 70B).
“Renting two H100 servers for a year will cost approximately upwards of $300,000 a year, so deploying Llama 3.1 405B on premises is too expensive for small firms,” Patel said.
The reason behind the increase in infrastructure costs is the increase in model parameters, which provides more accurate results, SambaNova Systems’ McGonnell said.
Typically, any LLM provider releases multiple variants of models to allow enterprises to choose between latency and accuracy depending on use cases. While a model with more parameters can be more accurate, the one with fewer parameters requires less computation, takes less time to respond, and therefore costs less to run.
However, Patel and McGonnell both pointed out that most large-scale enterprises are likely to take advantage of the Llama 3.1 405B model, whether it is for fine-tuning and training other models or in production use cases like chatbots.
“Large enterprises might not view the cost of running the 405B model as that expensive given the level of intelligence and usefulness the model brings,” Patel said.
In addition, the analysts said that there is another way to reduce the cost of running the larger model. Several large cloud service providers, along with other model serving vendors, are already trying to bring the new model to their customers.
“Most firms will rely on cloud APIs to utilize Llama 3.1 405B. Every major cloud provider offers the model,” Patel said. Using APIs allows enterprises to access the necessary compute resources on a pay-as-you-go basis, reducing upfront investments, Patel added.
Meta said it had partnered with the likes of Accenture, AWS, AMD, Anyscale, Cloudflare, Databricks, Dell, Deloitte, Fireworks.ai, Google Cloud, Groq, Hugging Face, IBM watsonx, Infosys, Intel, Kaggle, Microsoft Azure, Nvidia DGX Cloud, OctoAI, Oracle Cloud, PwC, Replicate, Sarvam AI, Scale.AI, SNCF, Snowflake, Together AI, and the UC Berkeley vLLM Project to make the Llama 3.1 family of models available and simpler to use.
While cloud service providers such as AWS and Oracle will provide the latest models, partners such as Groq, Dell, and Nvidia will allow developers to use synthetic data generation and advanced retrieval augmented generation (RAG) techniques, Meta said, adding that Groq has optimized low-latency inference for cloud deployments, and that Dell has achieved similar optimizations for on-prem systems.
Other large models, such as Claude, Gemini, and GPT-4o, are also served via APIs.
Additionally, McGonnell pointed out that the availability of Llama 3.1 will spark a race among AI cloud service providers and model serving vendors to offer the most efficient and cost-effective API solutions for deploying Llama 3.1 405B.
TogetherAI and Fireworks.ai, both of which are Meta’s partners in proliferating its latest model, according to Patel are bringing the most innovative inference optimizations to reduce costs significantly.
Will Llama 3.1 spell doom for rival LLM providers?
The release of a somewhat open LLM that can perform better or as good as closed proprietary LLMs poses a significant challenge to rival LLM providers, big or small, experts and analysts believe.
“Companies like Cohere, Aleph Alpha, and similar startups developing proprietary LLMs likely won’t exist in the next one or two years or they’ll just survive in a much smaller niche and more expensive form. It’s like betting on Solaris when the world gravitated toward Windows, Mac, and Linux,” Zwingmann of Rapyd.AI said.
In addition, McGonnell pointed out that as LLMs start to become more commoditized due to their open natures, proprietary providers like OpenAI will either need to compete on reducing their costs or improving their performance.
“We have been seeing OpenAI starting to release cheaper versions of GPT-4, suggesting that they are focused on reducing costs,” McGonnell at SambaNova Systems said.
Further, within 24 hours of Meta releasing the Llama 3.1 update, OpenAI also took to Twitter, now rebranded as X, to alert its customers to releasing a free tier for customizing its GPT-4o mini model.
Rapyd.AI’s Zwingmann said that this battle between open and proprietary LLMs will benefit enterprises. “Expect token costs for LLMs to come down even further. There’s no longer a big moat that allows any vendor to charge significantly more than the market average,” the managing partner explained.
Tokens are the units used to measure the amount of text processed by an LLM API when it breaks down a query from a user.
The Llama family of models, according to Bradley Shimmin, industry analyst at Omdia, already dominates its direct and larger LLMs, especially proprietary ones from Google, Anthropic, and OpenAI. Omdia’s research is based on investigating and collating job posts seeking skills for working on Meta’s family of LLMs.
Open weights vs. open source
Although Meta and its CEO Mark Zuckerberg describe the latest family of Llama models as open source, several analysts begged to differ. Omdia’s Shimmin said that Meta’s models are not truly open source as defined by the Open Source Initiative.
“All Llama models are not actually open source as we would see with software licensed under MIT or Apache agreements. I would rather say that it is an open and permissive community license that gives AI practitioners everything they need to build AI outcomes for commercial use,” Shimmin explained.
Shimmin said that although Meta provides the model weights for all of its LLMs, the company doesn’t provide full transparency into the data used for pre-training the LLMs.
The larger part of the problem, according to experts, is that there is currently no definition of what an open source LLM is or should be.
OpenAI announces free fine-tuning for GPT-4o mini model 24 Jul 2024, 2:07 pm
OpenAI is offering free fine-tuning on its new GPT-4o mini model, allowing users to train the model on additional data at no charge to enable higher performance for specific use cases.
GPT-4o mini fine-tuning is available to developers in OpenAI’s Tier 4 and 5 usage tiers, which are the highest-priced tiers among OpenAI’s plans. OpenAI plans to gradually expand access to free fine-tuning to all tiers. Free fine-tuning will be offered now through September 23.
Developers can start fine-tuning GPT-4o mini for free by visiting their fine-tuning dashboard, clicking “create,” and selecting “GPT-4o mini” from the base model drop-down menu. Each organization gets 2M training tokens per 24-hour period to train the model. Any overage will be charge $3.00 per 1M tokens. More details on free fine-tuning are offered in OpenAI’s fine-tuning docs.
Compared to fine-tuning with OpenAI’s GPT 3.5 Turbo, GPT-4o mini is positioned to be more cost-efficient and more capable, with longer context and lower latency. GPT-4o mini was launched July 18 with the intention of expanding the range of applications built with AI by making intelligence more affordable. It enables a range of tasks such as applications that chain or parallelize model calls, pass a large volume of context to the model, or interact with customers through fast real-time text responses, such as customer support chatbots.
How to create an operational data store with TiDB 24 Jul 2024, 11:00 am
Data is the lifeblood of the modern organization. It is constantly moving and changing, vast in scale and dizzying in velocity. It is widely distributed, available everywhere, driving operations and guiding strategic decisions.
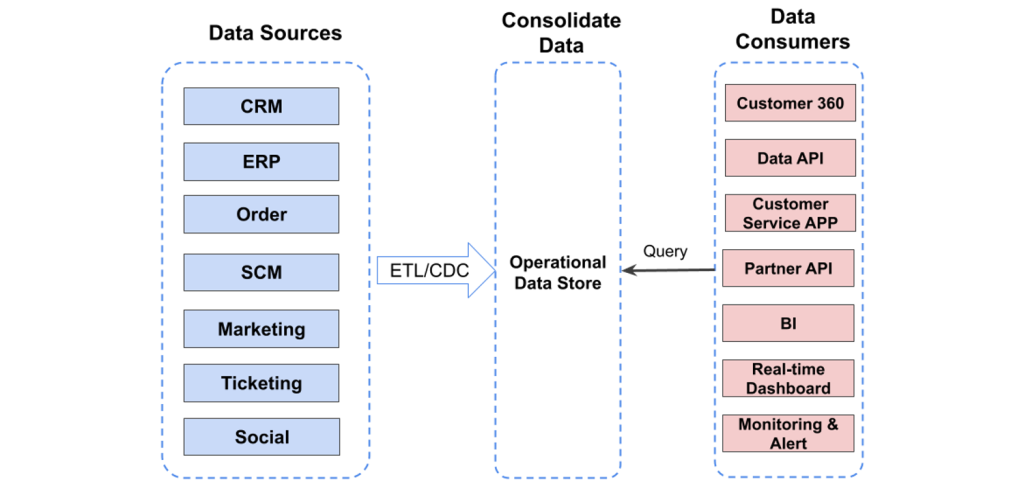
This explains why more and more organizations are implementing an “operational data store.” An operational data store acts as an intermediary between a vast array of data sources and data consumers, including business analysts, developers, and senior decision-makers.
An operational data store is quite different from a data warehouse, which is a repository where data is shaped and organized for business intelligence and real-time data serving.
IDG
An operational data store is more like a temporary landing zone where data from across the organization is consolidated and transformed for use in real time. Data warehouses are for deep analysis and historical reflection. The operational data store, on the other hand, is for understanding the state of your business right now.
The operational data store synthesizes data from sources across the organization: CRM, IT ticketing, HR, marketing, customer service, and other functions.
Common use cases for an operational data store include:
- Supporting data-driven decision-making in real time
- Improving data governance, privacy, and compliance
- Modernizing legacy systems through data-as-a-service (DaaS)
- Efficient data processing.
The operational data store requires a robust technological infrastructure. Here we will discuss implementing an operational data store in TiDB, an open-source distributed SQL solution designed for high-performance applications.
Technological requirements
When selecting a data solution for your operational data store, there are four main requirements to keep in mind.
- Scalability. The operational data store must be able to collate huge volumes of data, including user identity and activity, from multiple systems, and support real-time queries.
- Performance. Unlike a data warehouse, where queries can run overnight, operational data store users expect real-time responses. Also, for the purposes of SLAs, system latency needs to be kept to a minimum.
- Reliability. Due to its always-on nature, an operational data store needs the ability to maintain operations under intense loads while isolating system failures.
- Flexible queries. The operational data store needs to support a range of use cases from business intelligence to real-time data processing and data serving. Providing enough capability and flexibility to query large volumes of data is critical.
Key considerations
Once you have selected your data solution—TiDB in this case—there are four areas to consider when implementing an operational data store.
Capacity planning
First determine the size of the clusters you need to support the workload. Since TiDB separates storage from query processing (see below about processing at the storage node), you will need to size your SQL and storage layers independently. Consider these factors when making your estimations.
- Storage needs will be determined by your overall data volume but also by query workload, because some queries will be pushed down to the storage layer for processing. That means you will need to consider not just raw storage, but compute for TiDB’s storage-based query workloads. For the SQL layer, start with a rough estimate to get the whole picture, then test with a real-world workload. A typical starting point for each node is 2TB to 4TB of storage and 16 cores per node, though especially heavy workloads might demand additional compute.
- Throughput mostly affects the SQL nodes. The key metric here is queries per second (QPS). It is difficult to formulate a general rule, since workloads differ so widely. Running your own benchmarks can give you a sense for how many QPS each node can handle, and can provide a starting point for further exploration. Perform your tests with real-world data and workloads to get a more accurate estimate. TiDB compute is relatively easy to add and remove, so despite the trial and error nature of this phase, implementation typically does not take long.
Schema design
If you are migrating from a single-node relational databases, such as PostgreSQL or Microsoft SQL Server, you can change the syntax of your queries while keeping your schema intact. You will probably need to re-consider the indexes—and possibly add more—or change the owners of certain columns.
If you are performing a greenfield implementation, you can take advantage of TiDB’s support for online schema changes. This approach has the advantage of allowing you to design for the needs you have today, rather than trying to envision your needs in the future. As your data volume grows or you need to generate new reports and queries, or change an index, you can simply implement the change through the online DDL.
This points up a major difference between NoSQL solutions and TiDB. While NoSQL solutions are easy to implement on scalable storage, users often find themselves limited by their inability to do more than simple key-value gets/scans as their needs become more complex. With TiDB’s online schema change, you can quickly build the first version of your operational data store without worrying much about future needs, knowing you can always adjust the schema as your needs grow.
Ecosystem
Adopting TiDB as an operational data store enhances an organization’s ability to leverage real-time data across diverse operations, fostering enhanced decision-making and operational efficiency. Here we’ll explore how to integrate TiDB with your existing data ecosystem.

IDG
Compatibility and data ingestion from various upstreams
Successful operational data store implementation begins with effective data ingestion from various upstream systems. For this, TiDB provides several relevant features:
- Compatibility and connectors: TiDB supports a wide range of data ingestion protocols and offers connectors for popular databases such as MySQL, as well as for Apache Kafka for message streaming. This ensures that TiDB can integrate smoothly with existing data infrastructures, making it a central point for operational data activities.
- Standard SQL interface: By providing a fully compatible MySQL interface, TiDB allows existing applications and tools to communicate with it without requiring changes in the application code. This SQL compatibility reduces the friction involved in replacing or integrating new components within the data stack.
Synchronizing with data warehouses and data lakes
Once data is ingested, the next step is to synchronize that data with data warehouses and data lakes for comprehensive analysis and storage. TiDB also provides robust tools and features for this purpose:
- TiCDC: TiDB’s Change Data Capture (CDC) feature streams changes made to the database in real time. This is essential for maintaining data consistency between TiDB and external data stores like data lakes and warehouses, enabling real-time analytics and extract, transform, and load (ETL) processes.
- TiDB Lightning: For efficient large-volume data transfers from data warehouses or data lakes into TiDB, TiDB Lightning is the tool of choice. It facilitates fast and reliable batch data loading, making it ideal for initializing new database clusters with historical data or merging batch analytics results into the operational data store.
Integration with applications and BI tools
A versatile operational data store must seamlessly integrate with both the consuming applications and the analytical tools that help businesses derive actionable insights:
- API accessibility: For custom applications, TiDB supports numerous APIs that enable direct interaction with the data layer, facilitating custom operational dashboards and real-time data functionalities within proprietary systems.
- Broad BI tool compatibility: Thanks to TiDB’s SQL interface, it integrates effortlessly with a wide range of BI tools, such as Tableau, Microsoft Power BI, and Looker, allowing for complex data analyses and visualizations directly on real-time data.
- Integration with popular compute engines: TiDB works seamlessly with Apache Spark and Apache Flink, enabling complex data processing and analytics workflows. This integration allows businesses to perform large-scale data processing and stream analytics, enhancing real-time data processing capabilities. For instance, data analysts can use Spark for complex batch processing and machine learning models, while Flink can be employed for real-time stream processing and event-driven applications.
Multi-tenant environments
Unlike the storage at the back of an operational app, an operational data store is usually shared among several services. Those services may come with different requirements and priorities. Properly allocating and isolating resources among these services not only can improve the user experience but also can be more cost-effective.
TiDB provides an advanced feature called Resource Control, which is a fine-grained resource usage control mechanism. This resource control mechanism allows for precise management of compute and storage resources, ensuring that each service receives the necessary resources to perform optimally without interfering with others. This capability not only enhances the overall user experience by maintaining high performance and availability but also optimizes operational costs. Services can scale resource usage up or down based on real-time demands, making the operational data store both flexible and cost-effective.
By implementing TiDB’s resource control features, organizations can ensure a balanced and efficient distribution of resources, which is critical for maintaining the stability and responsiveness of shared data environments.
Making the most of data
In an era of fast-paced innovation and global competition, data plays an instrumental role in driving business decisions and operational efficiency. An operational data store like the one described in this article can help businesses achieve seamless connectivity between varied data sources, data warehouses, data lakes, and end-user applications while harnessing real-time insights for strategic decision-making. TiDB’s robust data ingestion, data synchronization, and extensive compatibility with BI tools, along with its ability to handle large-scale data operations with minimal latency, make it a formidable choice for this purpose.
Whichever solution you use to build your operational data store, the result is more than just another technology solution. It’s a way to embrace the new business reality, where data is the key to making operations robust, adaptable and aligned with your strategic goals.
Li Shen is senior vice president at PingCAP, the company behind TiDB.
—
New Tech Forum provides a venue for technology leaders—including vendors and other outside contributors—to explore and discuss emerging enterprise technology in unprecedented depth and breadth. The selection is subjective, based on our pick of the technologies we believe to be important and of greatest interest to InfoWorld readers. InfoWorld does not accept marketing collateral for publication and reserves the right to edit all contributed content. Send all inquiries to doug_dineley@foundryco.com.
What is GraphQL? Better APIs by design 24 Jul 2024, 11:00 am
When most software developers think of web APIs, we think of REST, or Representational State Transfer. With REST, you send a request to a request-specific URL and receive the results in whatever format makes sense for the application.
Meta’s web API system, GraphQL, is a different kind of API. With GraphQL, developers use a strongly typed query language to define both requests and responses, allowing an application to specify exactly what data it needs from an API. Thus GraphQL is meant as a more efficient, structured, and systematic alternative to REST.
In this article, you will learn how GraphQL differs from REST, how those differences impact API design, and why GraphQL often makes a better choice than REST for fetching data from a server.
GraphQL vs. REST
With REST, you typically submit your request by way of a specially crafted URL, with each variety of request sent to a different endpoint—for instance, /movie/2120 vs. /director/5130.
With GraphQL, you submit a declarative request in a JSON-like query for the data you’re seeking, and all requests go to the same endpoint. The schema used for the request determines what data you’ll get back. It’s a standardized, self-describing way to ask for the specific data you need, and only the data you need. Using different schemas for different types of requests, rather than a different endpoint URL format, makes for a much more flexible query mechanism.
Although many REST APIs also conform to a common specification, Swagger, there’s no rule that says a REST API has to be generated by Swagger. GraphQL provides a formal definition for the API by default. In this respect, GraphQL is a little like SQL. With an SQL-powered data source, you connect to one common endpoint for all your data requests, and the formatting of the request determines what records you’ll get back. And while there are many different implementations of SQL, the syntax of SQL queries remain highly consistent across those implementations.
GraphQL queries
So, we’ve already said that GraphQL uses a schema, or a data definition, to describe how the data to be retrieved is organized in the query and the response. Anyone who has worked with an ORM (object-relational mapper) should find GraphQL’s data schema definitions familiar. Here’s an example:
type Movie {
    id: ID
    title: String
    released: Date
    director: Director
}

type Director {
    id: ID
    name: String
    movies: [Movie]
}
You’ll notice that each element in the schema has a type definition. GraphQL has its own type system for queries, which is used to validate the incoming schema and to return data in a format consistent with the definition.
Queries submitted to GraphQL are similarly defined by a schema:
type Query {
    movie_title(title: String!): Movie
    director(id: ID): Director
}
Here we have a query that takes in up to two parameters, movie_title (by way of its title), and director (also by way of an ID.)
The ! next to a type indicates that this is a mandatory element in the query. In other words, you must query for a movie by title, with the director being optional (as a way to narrow the query).
Mandatory elements can also be used in a data schema. Here’s one possible way to format a query that searches for movies by their ID only:
query GetMovieByID ($id: ID!) {
    movie(id: $id) {
        name
    }
}
This query uses a separately defined variable ($id), which is required, to look up a movie by its ID number and return its name. Note that GraphQL queries can return related objects and their fields, not just individual fields. It does this by nesting arrays of items inside fields.
Variables for queries are passed along in a separate section of the query, using a format like this:
{
    “id”: 23
}
GraphQL types
GraphQL’s query type system specifies many common scalar types, like strings and integers. Most queries will revolve around those. But the type system also includes several advanced types for more sophisticated queries:
- The
interfacetype can be used to create an abstract type with a pre-defined set of fields, which other types can implement and re-use. - The
uniontype allows different kinds of results to be returned across multiple types from a single kind of query. inputtypes can be used to pass whole objects of the above kind as parameters in a query, provided those objects are created out of common scalar types that can be validated.
If you’re working with interface or union objects, you’ll need to use inline fragments and directives to return data based on the conditions those object types can specify.
Another kind of type that can be returned in a query is the edge type, returned in an optional edges field. Edges contain nodes—data records—and cursors, which are encoded strings that provide contextual information about how to paginate backwards or forwards from that object.
{
    movie {
        name
        actors (first:5) {
            edges {
                cursor
                node {
                    name
                }
            }
        }
    }
}
In this example, a movie node would return the name of the movie and its actors. For each actor in the movie, we’d receive a node containing the actor’s name and a cursor that allows browsing the actor’s “neighbors.”
Pagination with GraphQL
A common scenario when working with any data source is to request data in pages by way of a cursor. GraphQL provides a number of ways to do pagination.
When you request records, you can specify not only how many records to request and the starting offset, but how to request successive pages. The example code in the previous section returns only the first five actors associated with a given movie—as indicated by the first:5 parameter in parentheses.
The first: clause after actors can be followed by other keywords that describe how to fetch the succeeding items. offset: can be used for simple offsets, but the offset might be thrown off when data is added or deleted.
For the most robust pagination, you’ll want to use a cursor that can be delivered along with the object you’re requesting, by using the edge type described above. This allows you to create pagination mechanisms that are not disrupted when data is inserted or deleted between paginations—for instance, by using the object’s unique ID (or any other attribute as long as it’s unique) as a starting key index for other calculations.
Changing data with GraphQL mutations
With a REST API, you make changes to the server-side data by submitting requests that use POST, PATCH, and other HTTP verbs. With GraphQL, you use a specific query schema to make changes, a mutation query—again, in much the same way SQL uses UPDATE or DELETE queries.
To make changes to the data, you submit a GraphQL query using a schema called a mutation schema:
mutation CreateMovie ($title: String!, $released: Date!) {
    createMovie (title: $title, released: $released){
        id
        title
        released
    }
}

[submitted data]

{
    “title”: “Seven Samurai”
    “released”: “1950”
}
All queries, including mutation queries, can return data. Here, the list of fields in the curly braces after createMovie specifies what we want to see returned from the server after a new record is created with this request. The value for the id field, in this case, would be created by the database; the values for the other fields are submitted in the query.
Another thing to keep in mind is that the queries and data types used to return data are by design different from those used to request data. Mutation queries need to validate incoming data, so the types used for those queries are meant to serve that function. Likewise, the fields used in returned query objects are for display, not validation. If you take in a GraphQL object as returned from a query, it might have fields with circular references or other issues that make it unusable as a query parameter.
Why use GraphQL?
A key reason to choose GraphQL over REST is the explicit, declarative nature of GraphQL queries. Having a formal definition for how queries and returned data should look has advantages aside from being consistent across APIs and implementations.
As API evangelist Phil Sturgeon noted in his examination of GraphQL vs. REST, the field structure of GraphQL makes it easier to apply more granular versioning to queries, since specific fields can be deprecated or rolled in over time as opposed to versioning the entire API. It’s still possible to take the wholesale versioning approach with GraphQL; the point is that you aren’t forced to do so when rolling out changes.
Sashko Stubailo, engineering manager at Apollo GraphQL, maker of open source tools for GraphQL APIs, notes another advantage of the GraphQL approach: It’s self-documenting. “Every possible query, object, and field comes with a name, description, and type information that can be queried from the server in a standard way,” Stubailo writes.
The self-documenting nature of GraphQL also provides a sort of introspection, meaning you can use queries to return information about themselves. This way, software that works with GraphQL queries doesn’t have to be hard-wired to work with any particular field set; it can infer the fields automatically.
The fact that GraphQL is newer and REST/Swagger are older should not, by itself, be a reason to favor GraphQL. As Arnaud Lauret, author of The Design of Everyday APIs said in a discussion of the two standards: “A GraphQL API, just like a REST one, must be created with a purpose and designed from an outside-in perpective and not an inside-out one.”
Full-stack development with Java, React, and Spring Boot, Part 1 24 Jul 2024, 11:00 am
One of the most popular stacks today is combining Spring Java on the back end with a React front end. Implementing a full-stack Spring Java React application requires many decisions along the way. This article helps you get started by laying out a project structure for both ends of the stack, then developing an app that supports basic CRUD operations. My next two articles will build on the foundation we establish here by incorporating a datastore and deploying the application into a production environment.
Getting started with Spring Java and React
There are very good reasons for Java’s long-lived popularity as a server-side platform. It combines unbeatable maturity and breadth with a long and ongoing history of innovation. Using Spring adds a whole universe of capability to your back end. React’s ubiquity and fully-realized ecosystem make it an easy choice for building the front end.
To give you a taste of this stack, we’ll build a Todo app that leverages each of these technologies. The example might be familiar if you read my recent intro to HTMX for Java with Spring Boot and Thymeleaf. Here’s a peek at the Todo app’s user interface:
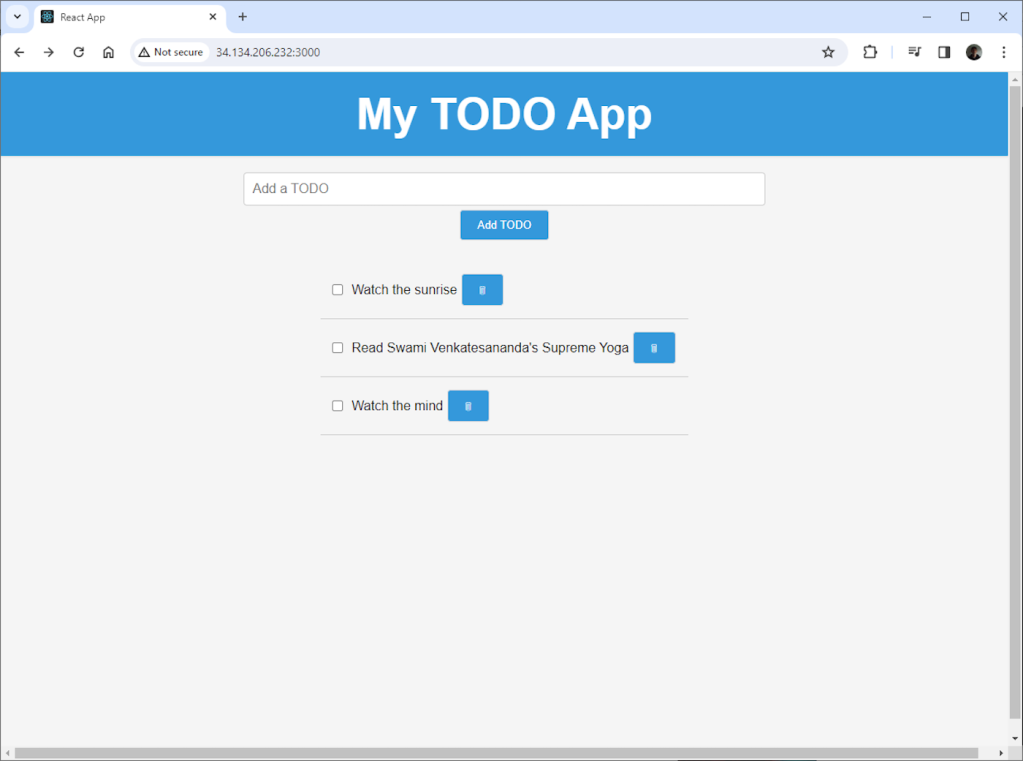
Matthew Tyson
For now, we’ll just save the to-do items to memory on the server.
Setting up Spring and React
There are several ways to go about setting up React and Spring together. Often, the most useful approach is to have two separate, full-fledged projects, each with its own build pipeline. We’ll do that here. If you’d rather focus on the Java build and make the React build secondary, consider using JHipster.
Setting up two discrete builds makes it easier for different people or teams to work on just one aspect of the application. To start, we’ll create a new Spring Boot project from the command line:
$ spring init iw-react-spring --dependencies=web --build=maven
That command lays out a basic project with support for web APIs. As you see, we’re using Maven for the build tool. Now, we can move into the new directory:
$ cd iw-react-spring
Before doing anything else, let’s add the React project. We can create it by calling create react app from the react-spring directory:
/iw-react-spring/src/main$ npx create-react-app app
Now we have a src/main/app directory containing our React app. The features of this setup are that we can commit the entire app, both sides, to a single repository, then run them separately during development.
If you try them, you’ll see that both apps will run. You can start the Spring app with:
/iw-react-spring$ mvn spring-boot:run
To start the React app, enter:
/iw-react-spring/app$ npm start
Spring will be listening on localhost:8080 while React listens on localhost:3030. Spring won’t do anything yet, and React will give you a generic welcome page.
Here’s the project outline so far:
/iw-react-spring/app– contains the React app/app/src– contains the react sources
/src– contain the Spring sources
The Spring Java back end
The first thing we need is a model class for the back end. We’ll add it to src/main/java/com/example/iwreactspring/model/TodoItem.java:
package com.example.iwjavaspringhtmx.model;

public class TodoItem {
  private boolean completed;
  private String description;
  private Integer id;
  public TodoItem(Integer id, String description) {
    this.description = description;
    this.completed = false;
    this.id = id;
  }
  public void setCompleted(boolean completed) {
    this.completed = completed;
  }
  public boolean isCompleted() {
    return completed;
  }
  public String getDescription() {
    return description;
  }
  public Integer getId(){ return id; }
  public void setId(Integer id){ this.id = id; }
  @Override
  public String toString() {
    return id + " " + (completed ? "[COMPLETED] " : "[ ] ") + description;
  }
}
This is a simple POJO that holds the data for a todo. We’ll use it to shuttle around the to-do items as we handle the four API endpoints we need to list, add, update, and delete to-dos. We’ll handle those endpoints in our controller at src/main/java/com/example/iwreactspring/controller/MyController.java:
package com.example.iwreactspring.controller;

  private static List items = new ArrayList<>();

  static {
    items.add(new TodoItem(0, "Watch the sunrise"));
    items.add(new TodoItem(1, "Read Venkatesananda's Supreme Yoga"));
    items.add(new TodoItem(2, "Watch the mind"));
  }


@RestController
public class MyController {
  private static List items = new ArrayList<>();

  static {
    items.add(new TodoItem(0, "Watch the sunrise"));
    items.add(new TodoItem(1, "Read Swami Venkatesananda's Supreme Yoga"));
    items.add(new TodoItem(2, "Watch the mind"));
  }

  @GetMapping("/todos")
  public ResponseEntity> getTodos() {
    return new ResponseEntity<>(items, HttpStatus.OK);
  }

  // Create a new TODO item
  @PostMapping("/todos")
  public ResponseEntity createTodo(@RequestBody TodoItem newTodo) {
    // Generate a unique ID (simple approach for this example)
    Integer nextId = items.stream().mapToInt(TodoItem::getId).max().orElse(0) + 1;
    newTodo.setId(nextId);
    items.add(newTodo);
    return new ResponseEntity(newTodo, HttpStatus.CREATED);
  }

  // Update (toggle completion) a TODO item
  @PutMapping("/todos/{id}")
  public ResponseEntity updateTodoCompleted(@PathVariable Integer id) {
    System.out.println("BEGIN update: " + id);
    Optional optionalTodo = items.stream().filter(item -> item.getId().equals(id)).findFirst();
    if (optionalTodo.isPresent()) {
      optionalTodo.get().setCompleted(!optionalTodo.get().isCompleted());
      return new ResponseEntity(optionalTodo.get(), HttpStatus.OK);
    } else {
      return new ResponseEntity(HttpStatus.NOT_FOUND);
    }
  }

  // Delete a TODO item
  @DeleteMapping("/todos/{id}")
  public ResponseEntity deleteTodo(@PathVariable Integer id) {
    System.out.println("BEGIN delete: " + id);
    Optional optionalTodo = items.stream().filter(item -> item.getId().equals(id)).findFirst();
    System.out.println(optionalTodo);
    if (optionalTodo.isPresent()) {
      items.removeIf(item -> item.getId().equals(optionalTodo.get().getId()));
      return new ResponseEntity<>(HttpStatus.NO_CONTENT);
    } else {
      return new ResponseEntity<>(HttpStatus.NOT_FOUND);
    }
  }
}
The ArrayList class and HTTP methods
In addition to our endpoints, we have an ArrayList (items) to hold the to-dos in memory, and we pre-populate it with a few items using a static block. We annotate the class itself with Spring’s @RestController. This is a concise way to say to Spring Web: handle the HTTP methods on this class and let me return values from the methods as responses.
Each method is decorated with an endpoint annotation, like @DeleteMapping(“/todos/{id}”), which says: this method handles HTTP DELETE requests at the /todos/{id} path, where {id} will be whatever value is on the request path at the {id} position. The {id} variable is obtained in the method by using the (@PathVariable Integer id) annotated method argument. This is an easy way to tie parameters on the path to variables in your method code.
The logic in each endpoint method is simple, and just operates against the items array list. Endpoints use the ResponseEntity class to model the response, which lets you display the response body (if required) and an HTTP status. @RestController assumes application/json as the response type, which is what we want for our React front end.
The React front end
Now that we have a working back end, let’s focus on the UI. Move into the /iw-react-spring/src/main/app directory and we’ll work on the App.js file, which is the only front-end code we need (except for a bit of typical CSS in App.css>). Let’s take the /iw-react-spring/src/main/app/App.js file in two parts: the code and the template markup, beginning with the markup:
My TODO App
{todos.map(todo => (
-
toggleTodoComplete(todo.id)} />
{todo.description}
))}
See my GitHub repo for the complete file.
Here, the main components are an input box with the ID todo-input, a button to submit it using the addTodo() function, and an unordered list element that is populated by looping over the todos variables. Each todo gets a checkbox connected to the toggleTodoComplete function, the todo.description field, and a button for deletion that calls deleteTodo().
Here are the functions for handling these UI elements:
import './App.css';
import React, { useState, useEffect } from 'react';

function App() {
  const [todos, setTodos] = useState([]);

  // Fetch todos on component mount
  useEffect(() => {
    fetch('http://localhost:8080/todos')
      .then(response => response.json())
      .then(data => setTodos(data))
      .catch(error => console.error(error));
  }, []);

  // Function to add a new TODO item
  const addTodo = (description) => {
    fetch('http://localhost:8080/todos', {
      method: 'POST',
      headers: { 'Content-Type': 'application/json' },
      body: JSON.stringify({ description }),
    })
      .then(response => response.json())
      .then(newTodo => setTodos([...todos, newTodo]))
      .catch(error => console.error(error));
  };

  // Toggle completion
  const toggleTodoComplete = (id) => {
    const updatedTodos = todos.map(todo => {
      if (todo.id === id) {
        return { ...todo, completed: !todo.completed };
      }
      return todo;
    });
    setTodos(updatedTodos);

    // Update completion
    fetch(`http://localhost:8080/todos/${id}`, {
      method: 'PUT',
      headers: { 'Content-Type': 'application/json' },
      body: JSON.stringify({ completed: !todos.find(todo => todo.id === id).completed }),
    })
      .catch(error => console.error(error));
  };
  const deleteTodo = (id) => {
    const filteredTodos = todos.filter(todo => todo.id !== id);
    setTodos(filteredTodos);
    fetch(`http://localhost:8080/todos/${id}`, {
      method: 'DELETE'
    })
    .catch(error => console.error(error));
  };
We have functions for creation, toggling completion, and deletion. To load the to-dos initially, we use the useEffect effect to call the server for the initial set of to-dos when React first loads the UI. (See my introduction to React hooks to learn more about useEffect.)
useState lets us define the todos variable. The Fetch API makes it pretty clean to define the back-end calls and their handlers with then and catch. The spread operator also helps to keep things concise. Here’s how we set the new todos list:
newTodo => setTodos([...todos, newTodo]),
In essence, we’re saying: load all the existing todos, plus newTodo.
Conclusion
Java and Spring combined with React provides a powerful setup, which can handle anything you throw at it. So far, our Todo example application has all the essential components for joining the front end to the back end. This gives you a solid foundation to use for applications of any size. Keep an eye out for the next article, where we will add a datastore and deploy the application to production.
Microsoft .NET Aspire automates Dockerfile builds 24 Jul 2024, 1:55 am
Microsoft has released .NET Aspire 8.1, an update to the cloud-ready stack for building distributed applications that adds support for building container images from Dockerfiles, as well as support for launching Python-based services.
NET Aspire 8.1 was unveiled on July 23. Developers can find instructions on installing .NET Aspire at learn.microsoft.com.
For building containers, .NET Aspire 8.1 adds two extensions, AddDockerfile(...) and WithDockerfile(...), that allow .NET Aspire to automatically build a Dockerfile when the app host runs. This enables developers to quickly edit Dockerfiles and rely on .NET Aspire to build them without having to manually build these themselves, Microsoft said. In addition to Dockerfile build support, Microsoft has added the ability to provide build arguments and build secrets.
For launching Python-based services, .NET Aspire 8.1 adds the AddPythonProject(...) extension method. Python support in .NET Aspire builds on the virtual environment (venv) tool. Launching Python projects from .NET Aspire also requires having the Aspire.Hosting.Python package installed.
With .NET Aspire 8.1 release, Microsoft said it would not be shipping an update of the Visual Studio IDE that includes the new workload. Therefore, developers should use installation instructions to update and install .NET Aspire. .NET Aspire is provided through a collection of NuGet packages that handle cloud-native concerns.
Other improvements featured in .NET Aspire 8.1:
- A new
WaitForResourceAsync(...)API is intended to make it easier to write test cases that need to wait for resources to initialize. Also, support has been added for MSTest and NUnit in test project templates. - Hosting packages for Keycloak and Elasticsearch components are featured in preview.
- A hosting package has been added for Garnet, an open-source cache-store system by Microsoft Research that is compatible with the RESP protocol.
- A hosting package has been added for the Milvus vector database.
- Support has been added for Azure WebPubSub.
Shiny for Python adds chat component for generative AI chatbots 23 Jul 2024, 10:10 pm
Shiny for Python 1.0 launched this week with built-in chatbot functionality. The Chat() component is aimed at making it “easy to implement generative AI chatbots, powered by any large language model (LLM) of your choosing,” according to today’s announcement. “The ai_model can be anything, but Chat makes it especially easy to use interfaces from OpenAI, Anthropic, Google, LangChain, and Ollama.”
Shiny 1.0 can be installed with the Python package manager of your choice, such as
pip install shiny
There are several ways to implement the LLM back end in a Shiny Python app, but the Shiny creators at Posit recommend starting with LangChain in order to “standardize response generation across different LLMs.”
The release comes with a suggested quickstart template as well as templates for model providers including Anthropic, Gemini, Ollama, and OpenAI. All of these templates are available at GitHub.
Make sure to include an API key if needed in a .env file for providers that need them. More info and some retrieval-augmented generation (RAG) recipes are available at the project’s chat examples page on GitHub.
Shiny for Python 1.0 also includes an end-to-end testing framework built around Playwright, two components for rendering data frames, and a styles argument for styling rendered data frames.
Google Cloud Spanner gets dual-region configuration option 23 Jul 2024, 6:10 pm
Google Cloud has updated its fully managed distributed SQL database service Spanner with an option to maintain dual-region configuration, which it claims will make it easier for enterprises to comply with data residency norms across countries with more limited cloud support, and at the same time ensure availability.
Before Google Cloud introduced the update, enterprises operating in countries with only two of the company’s cloud regions were restricted to using regional Spanner configurations as multi-region configurations for the database service required three regions, resulting in one region being outside the country and non-compliance from a data residency standpoint, the cloud services provider said.
The dual-region configuration option allows enterprises operating in countries with just two cloud regions of the company to comply with data residency norms as well as maintain high availability, Google said.
This new option, according to IDC’s research director Daphne Cheung, will offer enterprises more assurances and options in terms of supporting data residency norms.
However, Cheung pointed out that the addition of the dual-region configuration option is not an indication that data residency norms were not being complied with.
Rival cloud service providers such as AWS, Oracle, and Microsoft also offer multi-region setup for their database-as-a-service offerings. A few examples include Amazon Aurora, Amazon DynamoDB, and Oracle NoSQL database.
Other database vendors, such as Cockroach Labs and DataStax, also offer similar capabilities.
Google Cloud’s new dual-region configurations are now available in Australia, Germany, India, and Japan.
How does Spanner’s dual-region configuration work?
As part of the dual-region configuration setup for Spanner, Google Cloud has three replica databases each across the two regions (a total of six database replicas) operating in a country for an individual enterprise, Nitin Sagar, senior product manager at Google, explained in a blog post about dual-region Spanner configurations.
Each region runs two read/write replicas and a witness replica to maintain availability, Sagar explained, adding that when a zonal outage occurs affecting any one replica in a region, Spanner, due to the dual-region configuration setup, would be able to maintain availability as at least two replicas would be functional.
However, the product manager pointed out that in the event that an entire region faces outage and enterprises are in dual-region configuration setup for Spanner, the databases will lose availability.
“To recover availability, databases must switch to single-region mode, consisting of three replicas in a single region,” Sagar wrote, adding that Google continuously monitors for outages and upon detection automatically fails over and reconfigures the dual-region setup to a single-region setup to ensure availability.
Alternatively, enterprises can detect outages across regions via the health dashboard.
“When your availability or latency threshold breach alarms are triggered, you can manually trigger a failover to the single-region mode using the newly available ChangeQuorum API in the Google Cloud CLI,” Sagar explained.
The product manager also pointed out that if an enterprise performs a manual failover, then a manual failback to dual-region configuration must be performed, otherwise Spanner will continue to be in single-region mode, which has relatively lower availability.
New Spanner instances, according to the company, can be set up in dual-region configuration mode via the Google Cloud Console, the company said.
Old or existing Spanner instances, on the other hand, can be moved into a dual-region configuration setup using the database service’s self-serve instance move service.
“Moving your instance doesn’t incur any downtime, and Spanner continues to provide the usual transaction guarantees, including strong consistency, during the move,” Sagar wrote.
Earlier in February, the company had added vector support to Spanner and other database offerings, such as CloudSQL, Firestore, Bigtable, and Memorystore for Redis.
Agentic AI drives enterprises away from public clouds 23 Jul 2024, 6:05 pm
AI agents are nothing new. AI itself was old but is new again, and AI agents and agentic AI are another chapter. Agentic AI, known for its autonomous decision-making and complex goal management, radically transforms enterprise operations. The significant change is that public cloud providers are often not the desired platform of choice. Companies big and small are instead looking for smaller, more distributed platforms, including on-premises hardware servers and smaller devices. Let’s explore the driving forces behind this transition and its future implications for enterprise AI.
Agents are on the rise
Agentic AI refers to artificial intelligence systems designed with autonomous decision-making capabilities, enabling them to act independently to achieve specific goals. We’ve seen many instances of this idea over the years, more recently with personal digital assistants on our phones and devices and automated everything, from home HVAC systems to automobiles.
These systems possess advanced reasoning, learning, and adaptive functionalities, allowing them to process complex information, make informed choices, and execute tasks without continuous human oversight. Using sophisticated algorithms and vast data sets, agentic AI can analyze environments, predict outcomes, and initiate real-time actions. This form of AI aims to enhance efficiency and effectiveness by providing intelligent, goal-directed solutions across various domains, such as healthcare, finance, and transportation.
Historically, public cloud services from AWS, Microsoft Azure, Google Cloud, and others have dominated the cloud landscape. However, the unique demands of agentic AI are now leading enterprises to reconsider and ultimately move away from public cloud solutions for several reasons:
Data sovereignty and security are critical. Especially in regulated industries like finance, healthcare, and government, private clouds or on-premises servers provide greater control over data handling and storage, ensuring compliance and mitigating risks associated with data breaches.
Agentic AI applications often require high levels of customization and optimization. Non-public cloud environments allow for fine-tuning infrastructure to meet specific requirements and operate more efficiently. Companies gain improved performance and resource management compared to the standardized offerings of public clouds.
The cost structures of public cloud services can be unpredictable and prohibitive. Many enterprises are still reeling from post-pandemic cloud bills that are double or triple what they expected. Things were so bad, an entirely new space, finops, was created. By shifting to their own hardware servers and smaller dedicated devices, businesses can achieve greater cost predictability and control, avoiding the ongoing subscription fees and variable costs inherent in the public cloud.
Agent-based AI means smaller non-cloud systems
Edge computing—executing AI at the network edge on smaller devices—is gaining traction as part of this shift. By processing data locally, edge computing reduces latency and enhances security. Sensitive data remains closer to its source. For example, automotive manufacturers deploy edge AI to process real-time vehicle data, improving performance and safety without solely relying on cloud connectivity.
Decoupled and distributed systems running AI agents require hundreds of lower-powered processors that need to run independently. Cloud computing is typically not a good fit for this. However, it can still be a node within these distributed AI agents that run on heterogeneous and complex deployments outside public cloud solutions.
The ongoing maturation of agentic AI will further incentivize the move away from the public cloud. Enterprises will increasingly invest in dedicated hardware tailored to specific AI tasks, from intelligent Internet of Things devices to sophisticated on-premises servers. This transition will necessitate robust integration frameworks to ensure seamless interaction between diverse systems, optimizing AI operations across the board.
Although this will indeed increase complexity, heterogeneity, and operational expenses, it will also lead to more pragmatic AI deployments tailored to the needs of the business. Let’s face it: Enterprises will never build massive large language models for their own use; it’s too expensive, even on a public cloud provider. Agents and small language models are the more likely architectural options for AI.
In this case, doing what’s best for enterprises is not great for public cloud providers. However, don’t cry for them. The cloud is not the most optimized or cost-effective option, but it is still the “easy button” of AI. This makes it attractive to many AI builds and deployments, and many enterprises will select that path regardless.
Integrating agentic AI marks a significant pivot in enterprise strategy, driving companies away from public cloud solutions. By adopting non-public cloud technologies and investing in adaptable, secure, and cost-efficient infrastructure, enterprises can fully leverage the potential of agentic AI. This strategic shift enhances operational efficiency and aligns AI deployments more closely with business-specific needs and goals.
Deciding and iterating with Java statements 23 Jul 2024, 11:00 am
Java applications evaluate expressions in the context of statements, which are used for tasks such as declaring a variable, making a decision, or iterating over statements. We can write either simple or compound statements:
- A simple statement is a single standalone instruction for performing a task; it must be terminated with a semicolon character (
;). - A compound statement is a sequence of simple and other compound statements located between open- and close-brace characters (
{...}), which delimit the compound statement’s boundaries. Compound statements can be empty, will appear wherever simple statements appear, and are alternatively known as blocks. A compound statement is not terminated with a semicolon.
In this tutorial, you’ll learn how to use statements in your Java programs. You can use statements such as if, if-else, switch, for, and while to declare variables and specify expressions, make decisions, iterate (or loop) over statements, break and continue iteration, and more.
What you’ll learn in this Java tutorial
- How to write declaration statements
- How to write assignment statements
- About the decision statements: if, if-else, and switch
- About loop statements: for, while, and do-while
- What are breaking statements in Java?
- What are continue statements in Java?
- What are empty statements in Java?
- Example of statements in a Java program
How to write declaration statements in Java
In a previous article, I introduced variables as a way to store values in your Java code and explained that they must be declared before you can use them. Because a variable declaration is a standalone island of code, it’s effectively a statement—a simple statement, to be exact. All of these are variable declaration statements:
int age = 25;
float interest_rate;
char[] text = { 'J', 'a', 'v', 'a' };
String name;
A variable declaration minimally consists of a type name, optionally followed by a sequence of square-bracket pairs, followed by a name, optionally followed by a sequence of square-bracket pairs, and terminated with a semicolon. A variable may also be explicitly initialized when it is declared.
How to write assignment statements in Java
Now consider the assignment statement, which is closely related to the variable declaration statement. An assignment statement assigns a value (possibly a reference to an array or a reference to an object) to a variable. Here are some examples:
age = 30;
interest_rate = 4.0F;
age += 10;
text[1] = 'A';
text[2] = 'V';
text[3] = 'A';
name = "John Doe";
An assignment statement is an example of an expression statement, which is an expression that may be used as a statement if it is followed with a semicolon. The following expressions also qualify as expression statements:
- Preincrement (e.g.,
++x;) - Predecrement (e.g.,
--y;) - Postincrement (e.g.,
x++;) - Postdecrement (e.g.,
y--;) - Method call (e.g.,
System.out.println("Hello");) - Object creation (e.g.,
new String("ABC");)
Examples of variable declarations and expression statements
You can use jshell to experiment with variable declarations and expression statements. Here are some examples to get you started (see “Learn Java from the ground up” for an introduction to jshell):
jshell> int age = 25
age ==> 25

jshell> float interest_rate
interest_rate ==> 0.0

jshell> char[] text = { 'J', 'a', 'v', 'a' }
text ==> char[4] { 'J', 'a', 'v', 'a' }

jshell> String name
name ==> null

jshell> age = 30
age ==> 30

jshell> interest_rate = 4.0F
interest_rate ==> 4.0

jshell> age += 10
$7 ==> 40

jshell> text[1] = 'A'
$8 ==> 'A'

jshell> text[2] = 'V'
$9 ==> 'V'

jshell> text[3] = 'A'
$10 ==> 'A'

jshell> name = "John Doe"
name ==> "John Doe"

jshell> text
text ==> char[4] { 'J', 'A', 'V', 'A' }

jshell> age++
$13 ==> 40

jshell> age
age ==> 41
Notice that age++ doesn’t appear to have accomplished anything. Here, you see that 40 was assigned to the scratch variable $13. However, the postincrement operator performs the increment after returning the current value. (Actually, it stores the current value somewhere, performs the increment, and then returns the stored value.) Entering age proves that age contains 41, the result of the postincrement operation.
The Java Shell provides various commands and features to simplify working with snippets. For example, the /list command shows all snippets that have been entered in the current session:
jshell> /list

   1 : int age = 25;
   2 : float interest_rate;
   3 : char[] text = { 'J', 'a', 'v', 'a' };
   4 : String name;
   5 : age = 30
   6 : interest_rate = 4.0F
   7 : age += 10
   8 : text[1] = 'A'
   9 : text[2] = 'V'
  10 : text[3] = 'A'
  11 : name = "John Doe"
  12 : text
  13 : age++
  14 : age
The number in the left column uniquely identifies a snippet. You can use this number to re-execute a snippet, list the snippet, drop (delete) a snippet, and so on:
jshell> /12
text
text ==> char[4] { 'J', 'A', 'V', 'A' }

jshell> /list 13

  13 : age++

jshell> /drop 7
|  dropped variable $7

jshell> /list

   1 : int age = 25;
   2 : float interest_rate;
   3 : char[] text = { 'J', 'a', 'v', 'a' };
   4 : String name;
   5 : age = 30
   6 : interest_rate = 4.0F
   8 : text[1] = 'A'
   9 : text[2] = 'V'
  10 : text[3] = 'A'
  11 : name = "John Doe"
  12 : text
  13 : age++
  14 : age
  15 : text
Here, we’ve entered /12 to re-execute snippet #12, which outputs the contents of text. We then entered /list 13 to list snippet #13, which increments age. Next, we entered /drop 7 to delete snippet #7 (no more age += 10 snippet). Finally, we entered /list to re-list all snippets. Notice that snippet #7 has been removed, and a snippet #15 has been added thanks to the /12 command.
About the decision statements: if, if-else, switch
Decision statements let applications choose between multiple paths of execution. For example, if a salesperson sells more than 500 items this month, give the salesperson a bonus. Also, if a student’s grade on an algebra test is greater than 85 percent, congratulate the student for doing well; otherwise, recommend that the student study harder for the next test.
Java supports the if, if-else, and switch decision statements, along with the switch expressions feature.
Writing if statements
The simplest of Java’s decision statements is the if statement, which evaluates a Boolean expression and executes another statement when this expression evaluates to true. The if statement has the following syntax:
if (Boolean expression)
   statement
The if statement starts with reserved word if and continues with a parenthesized Boolean expression, which is followed by the statement to execute when the Boolean expression evaluates to true.
The following example demonstrates the if statement. When the age variable contains a value of 55 or greater, if executes System.out.println(...); to output the message:
if (age >= 55)
   System.out.println("You are or were eligible for early retirement.");
Many developers prefer to wrap any simple statement that follows the if statement in braces, effectively converting it to an equivalent compound statement:
if (age >= 55)
{
   System.out.println("You are or were eligible for early retirement.");
}
Although the braces clarify what is being executed by the if statement, I believe that the indentation provides this clarity, and that the braces are unnecessary.
Example if statements in jshell
Let’s try out this example usingjshell. Restart jshell and then introduce an age variable (of type int) that’s initialized to 55:
jshell> int age = 55
Next, enter the first example if statement (without the curly braces surrounding its body):
jshell> if (age >= 55)
   ...>    System.out.println("You are or were eligible for early retirement.");

You are or were eligible for early retirement.

jshell>
Notice that the jshell> prompt changes to the ...> continuation prompt when you enter a multiline snippet. Pressing Enter after the last snippet line causes jshell to immediately execute the snippet.
Execute /list to list all snippets. I observe that the if statement snippet has been assigned 2 in my session. Executing /2 causes jshell to list and then execute this snippet, and the same message is output.
Now, suppose you assign 25 to age and then re-execute /2 (or the equivalent snippet number in your session). This time, you should not observe the message in the output.
Writing if-else statements
The if-else statement evaluates a Boolean expression and executes a statement. The statement executed depends on whether the expression evaluates to true or false. Here’s the syntax for the if-else statement:
if (Boolean expression)
   statement1
else
   statement2
The if-else statement is similar to the if statement, but it includes the reserved word else, followed by a statement to execute when the Boolean expression is false.
The following example demonstrates an if-else statement that tells someone who is less than 55 years old how many years are left until early retirement:
if (age >= 55)
   System.out.println("You are or were eligible for early retirement.");
else
System.out.println("You have " + (55 - age) + " years to go until early retirement.");Chaining if-else statements
Java lets you chain multiple if-else statements together for situations where you need to choose one of multiple statements to execute:
if (Boolean expression1)
   statement1
else
if (Boolean expression2)
   statement2
else
   ...
else
   statementN
Chaining works by executing a subsequent if-else statement whenever the current if statement’s Boolean expression evaluates to false. Consider this demonstration:
if (temperature < 0.0)
   System.out.println("freezing");
else
if (temperature > 100.0)
   System.out.println("boiling");
else
   System.out.println("normal");
The first if-else statement determines if temperature‘s value is negative. If so, it executes System.out.println("freezing");. If not, it executes a second if-else statement.
The second if-else statement determines if temperature‘s value is greater than 100. If so, it executes System.out.println("boiling");. Otherwise, it executes System.out.println("normal");.
The dangling-else problem
When if and if-else are used together, and the source code isn’t properly indented, it can be difficult to determine which if associates with the else. You can see the problem in the code below:
int x = 0;
int y = 2;
if (x > 0)
   if (y > 0)
      System.out.println("x > 0 and y > 0");
else
   System.out.println("x <= 0");
You would probably expect to see x <= 0 as the output from this code, but it will never happen; instead, nothing will output. The problem is that the else matches up to its nearest if, which is if (y > 0). Reformatting the code makes it clearer what is happening:
int x = 0;
int y = 2;
if (x > 0)
   if (y > 0)
      System.out.println("x > 0 and y > 0");
   else
      System.out.println("x <= 0");
Here, the if-else statement follows the if (x > 0) statement. To match the intent of the previous example, you need to introduce brace characters around if (y > 0) and its subsequent statement. Essentially, a block will follow if (x > 0):
int x = 0;
int y = 2;
if (x > 0)
{
   if (y > 0)
      System.out.println("x > 0 and y > 0");
}
else
   System.out.println("x <= 0");
Because x > 0 evaluates to false, System.out.println("x <= 0"); executes. The else reserved word clearly matches up to if (x > 0).
Writing switch statements
When you need to choose between several execution paths, the switch statement offers a more efficient alternative to chaining. Here’s the switch statement at work:
switch (selector expression)
{
   case value1: statement1 [break;]
   case value2: statement2 [break;]
   ...
   case valueN: statementN [break;]
   [default: statement]
}
The switch statement begins with reserved word switch and continues with a selector expression that selects one of the subsequent cases or the default case to execute. The selector expression evaluates to an integer, a character, or a string.
Each case identifies a statement to execute. The case begins with the reserved word case and a value that labels the case. Following a colon (:) character is the statement to execute. The statement can be optionally followed by break;, to transfer execution to the first statement after switch. If none of the case labels matches the selector expression’s value, the optional default case, which begins with reserved word default, will execute.
Below is a switch statement used to determine if an integer value is even or odd (by using the remainder operator). It then outputs an appropriate message via the case whose label matches the remainder:
int i = 27;
switch (i % 2)
{
   case 0: System.out.println("even");
           break;

   case 1: System.out.println("odd");
}
In this case, the output would be odd because i % 2 yields 1, which matches the second case label. If we omitted break;, and if the number was even, the output would be even followed by odd, because execution would drop through to the second case.
Switching case
Sometimes, it’s desirable to have execution drop through to the next case. For example, suppose you wanted to execute common code in response to the user specifying an uppercase or lowercase command-line option letter:
switch (args[i])
{
   case "-v":
   case "-V": System.out.println("Version 1.0");
              break;

   // ...

   default  : System.out.println("unknown option");
}
Imagine that a for statement (discussed shortly) is iterating over each of the arguments in the array of command-line arguments passed to an application’s main() method. If the argument is -v (dash and lowercase v) or -V (dash and uppercase V), the application’s version number will be output. When -v is specified, it’s necessary to have execution drop through to the following case, which outputs the version number when -V is specified.
The default case is executed whenever the string referenced by args[i] doesn’t match any of the case labels. In other words, the user has specified an unknown option.
About loop statements: for, while, and do-while
Loop statements (also known as iteration statements) repeatedly execute other statements for a specific number of iterations (loops), or indefinitely until some terminating condition arises. For example, as previously mentioned, you might want to iterate over all of the String objects in the array of command-line arguments passed to a main() method. Java supports the for, while, and do-while iteration statements.
Writing for statements and for loops
The for statement executes another statement a specific number of times or indefinitely. It is essentially a compact form of the while statement (discussed later) and has the following syntax:
for ([initialize]; [test]; [update])
   statement
This example shows that a for statement begins with the reserved word for and continues with a parentheses-delimited and semicolon-separated sequence of three sections:
- initialize: A comma-separated list of variable declarations or assignments. These variables, which are known as iteration variables or loop variables, are used to index arrays, take part in calculations, or perform other tasks.
- test: A Boolean expression that determines how long the loop executes. Execution continues for as long as this expression remains true.
- update: A comma-separated list of expressions that typically modify the loop variables.
Following the for statement is a statement to execute repeatedly.
Each of the three sections is optional. As a result, for can be shrunk down to for (; ;). Because there is no stopping condition, the resulting loop is known as an infinite loop.
The following example uses the for statement to iterate over all elements in an array named args, outputting the value of each array element:
for (int i = 0; i < args.length; i++)
   System.out.println(args[i]);
This example works as follows:
- Declare variable
iand initialize it to0. - Evaluate
i < args.length. Ifiequalsargs.length, terminate the loop. - Execute
System.out.println(args[i]);. - Execute
i++. - Continue with Step 2.
Variable i is visible to the for statement’s test and update sections, and to statement. However, it isn’t visible to subsequent statements. If you want subsequent statements to see i‘s final value, declare i before for, as follows:
int i;
for (i = 0; i < args.length; i++)
   System.out.println(args[i]);
The variable that controls the loop can be a different primitive type, such as Boolean, character, or double precision floating-point. Here are three examples:
for (boolean b = false; b != true; b = !b)
   System.out.println(b); // This statement executes once.

for (char c = 'A'; c <= 'F'; c++)
   System.out.println(c);

for (double d = 0.0; d < 1.0; d += 0.1)
   System.out.println(d);
Finally, as previously mentioned, the initialize section can declare multiple variables. The following example declares two variables, incrementing one variable and decrementing the other variable throughout the loop:
for (int i = 0, j = 5; i <= 5; i++, j--)
   System.out.println(i + j);
The output consists of six lines of 5.
Writing while statements
The while statement repeatedly executes another statement while its controlling Boolean expression keeps evaluating to true. This statement has the following syntax:
while (Boolean expression)
   statement
This syntax shows that a while statement begins with the reserved word while and continues with a parenthesized Boolean expression. This statement is followed by another statement to execute repeatedly.
Here’s an example of the while statement:
int i = 0;
while (i < args.length)
{
   System.out.println(args[i]);
   i++;
}
This example works as follows:
- Declare variable
iand initialize it to0. - Evaluate
i < args.length. Ifiequalsargs.length, terminate the loop. - Execute
System.out.println(args[i]);. - Execute
i++. - Continue with Step 2.
This example is the while equivalent of the previous for example. You could compact the example to repeatedly execute a simple statement instead of a compound statement, as follows:
int i = 0;
while (i < args.length)
   System.out.println(args[i++]);
In this compacted example, we change the postincrement statement to an expression that’s passed to the array index operator. Although the code is more compact, some might prefer the previous example for clarity.
Writing do-while statements
The do-while statement repeatedly executes a statement while its controlling Boolean expression, which is evaluated after the statement is executed, evaluates to true. This statement has the following syntax:
do
   statement
while (Boolean expression); // The semicolon terminator is mandatory.
This syntax shows that a do-while statement begins with reserved word do, continues with a statement to execute repeatedly, and ends with the reserved word while, followed by a parenthesized Boolean expression.
The following example demonstrates the do-while statement:
int ch;
do
{
   System.out.println("Press x to continue.");
   ch = System.in.read();
}
while (ch != 'x');
This example works as follows:
- Declare
intvariablechto store a character’s numeric code. - Prompt the user to press the x key to continue.
- Read a key code from the keyboard via
System.in.read(), which is a companion ofSystem.out.println(). Because this method returns the key’s code as anint, assign this value toch. - Compare
ch‘s value with'x'. Note that'x'is widened fromchartointbefore the comparison. Terminate the loop when this expression evaluates to false (chequals'x'). Otherwise, continue with Step 2.
The difference between while and do-while is that while executes its statement zero or more times, whereas do-while executes its statement one or more times. You will choose either statement based on this property. For example, it’s appropriate to use while to iterate over the args array because this array might have zero length and you don’t want to access the array and raise an out-of-bounds exception. In contrast, you would access the array at least once with do-while. It’s appropriate to use do-while to prompt the user to enter a key and read the response because these tasks must happen at least once.
Breaking statements
You’ve seen the break statement used to break out of a switch statement after a case executed. We can also use break statements as part of an iteration statement, along with continue statement. We’ll explore both of these options.
Unlabeled and labeled break statements
The unlabeled break statement terminates a switch, for, while, or do-while statement by transferring execution to the first statement following this statement. Here it is by itself:
break;
Here’s an unlabeled break statement in an iteration statement context:
for (; ;)
{
   System.out.println("Press x to continue.");
   int ch = System.in.read();
   if (ch == 'x')
      break;
}
Here we’ve introduced a for-based infinite loop that repeatedly prompts the user to press the x key and reads this key until it equals 'x'. An if statement performs the comparison, executing break; to terminate the loop when the x key is pressed.
The labeled break statement
This statement terminates a containing and labeled switch, for, while, or do-while statement by transferring execution to the first statement following the containing statement. It has the following syntax:
break label;
This syntax consists of reserved word break followed by a non-reserved word identifier to serve as a label, followed by a semicolon. The label must be prefixed to a previous switch or iteration statement and must be followed by a colon.
The following example demonstrates the labeled break statement in an iteration statement context:
outer:
while (true)
{
   System.out.println("Guess number between 0 and 9.");
   while (true)
   {
      System.out.println("Press n for new game or q to quit.");
      int ch = System.in.read();
      if (ch == 'n')
         break;
      if (ch == 'q')
         break outer;
   }
}
This example presents a pair of nested infinite while loops that describe part of a number-guessing game. The outer loop is a stub for playing the game, whereas the inner loop prompts the user to play a new game or quit the game.
If the user presses the n key, the unlabeled break statement is executed to terminate the inner loop so that a new game can be played. If q is pressed, break outer; is executed to quit the outer loop, which is assigned an outer: label.
Continue statements
The continue statements can be labeled or unlabeled. The unlabeled continue statement skips the remainder of the current iteration and tells the iteration statement to advance to the next iteration. It has the following syntax:
continue;
Here’s an example usage of the unlabeled continue statement:
for (int i = -2; i <= 2; i++)
   if (i == 0)
      continue;
   else
      System.out.println(10 / i);
This example’s for statement iterates from -2 to 2, repeatedly executing an if-else statement and then incrementing i by 1 after each iteration.
To prevent a divide-by-zero exception when i contains 0, if tests i for 0. If this is the case, it executes continue;, which causes for to increment i and then evaluate i <= 2. Otherwise, 10 / i is evaluated and the result is output.
The labeled continue statement skips the remaining iterations of one or more nested iteration statements and transfers execution to the labeled iteration statement. It has the following syntax:
continue label;
This syntax consists of reserved word continue followed by a non-reserved word identifier to serve as a label, followed by a semicolon. The label must be prefixed to a previous iteration statement and must be followed by a colon.
Here’s an example using the labeled continue statement:
outer:
for (int i = -2; i <= 2; i++)
   for (int j = -2; j <= 2; j++)
      if (i == 0)
         continue outer;
      else
      if (j == 0)
         continue;
      else
         System.out.println(10 / i * j);
This example presents a pair of nested for loops, with each loop variable ranging from -2 through 2. The idea is to divide 10 by the product of the loop variable values. However, division by zero will occur when either variable contains 0.
To prevent division by zero, a chained if-else statement is used to test i‘s and j‘s values for 0. If i‘s value is 0, continue outer; is used to terminate the inner loop and advance the outer loop (with label outer:) past 0. If j‘s value is 0, continue; is used to quit the current inner loop iteration and advance the inner loop past 0. If neither situation arises, the calculation is performed and its result is output.
Empty statements
There is one final statement to consider, which is the empty statement, a statement consisting solely of the semicolon character. This statement accomplishes nothing, and yet it is useful. Consider the following example:
for (int ch; (ch = System.in.read()) != -1; System.out.print((char) ch));
This example copies the contents of the standard input stream, read via calls to System.in.read(), to the standard output stream, written via calls to System.out.print(), a companion to System.out.println() that doesn’t output a line separator. It works best when the standard input stream is redirected from the keyboard to a text file.
When redirected to a file, System.in.read() returns -1 when there is no more input. When not redirected, System.in.read() obtains its input from the keyboard and never returns -1. Instead, when there are no more key codes to return, System.in.read() returns a line separator character — two calls are needed on Windows to return its rn characters, one call is needed on UnixLinux to return its n character, and one call is needed on older versions of Mac OS to return its r character. For more information, check out Newline.
As you can see, all of the work is performed in the for statement’s initialize and test sections. The final semicolon refers to the empty statement, which is executed repeatedly.
Be careful with the empty statement because it can be the source of hard-to-find bugs. For example, you might expect the following for statement to output 10 instances of the word Hello:
for (int i = 0; i < 10; i++);
   System.out.println("Hello");
Instead, you will only observe a single instance of this word, because of the empty statement after the for statement’s closing parenthesis. for executes the empty statement 10 times, after which the method call is executed once.
Example program with Java statements
Now that you’ve learned about Java statements, you can start using them to write interesting Java applications. As an example, I’ve written a game that randomly selects an integer ranging from 0 through 9 and asks you to guess the number. If you guess too high or too low, the game will tell you. It will also tell you when you guess correctly, and it will ask you if you want to play again.
You’ll see several classes and methods in the code:
- I use
System.in.read()to return either the code of a pressed key (when standard input is not redirected) or an 8-bit value from a file (when standard input is redirected).System.in.read()is capable of throwing an exception, so I had to append “throws Exception” to themain()method header, as inpublic static void main(String[] args) throws Exception. This prevents the compiler from reporting an error. - To obtain a random integer, I need to invoke the
random()method member of the standard class library’sMathclass.random()returns a floating-point value ranging from 0.0 to almost 1.0. An expression converts this number to a more useful integer.
Listing 1 presents the source code for the Guess application.
Listing 1. Example application using statements in Java
class Guess
{
   public static void main(String[] args) throws Exception
   {
      outer:
      while (true)
      {
         System.out.println("I'm thinking of a number between 0 and 9.");
         int number = (int) (Math.random() * 10);
         while (true)
         {
            int guessNumber;
            while (true)
            {
               System.out.println("Enter your guess number between 0 and 9.");
               guessNumber = System.in.read();
               while (System.in.read() != 'n');
               if (guessNumber >= '0' && guessNumber <= '9')
               {
                  guessNumber -= '0';
                  break;
               }
            }
            if (guessNumber < number)
               System.out.println("Your guess is too low.");
            else
            if (guessNumber > number)
               System.out.println("Your guess is too high.");
            else
            {
               System.out.println("Congratulations! You guessed correctly.");
               while (true)
               {
                  System.out.println("Press n for new game or q to quit.");
                  int ch = System.in.read();
                  while (System.in.read() != 'n');
                  if (ch == 'n')
                     continue outer;
                  if (ch == 'q')
                     break outer;
               }
            }
         }
      }
   }
}
Guess demonstrates many of Java’s fundamental language features, including statements. The main() method presents a while statement that generates a new number and gives you a chance to guess it. The expression (int) (Math.random() * 10) multiplies random()‘s return value by 10 to change the range to 0.0 to almost 10.0, and converts the result to an integer ranging from 0 through 9.
After generating the number, main() executes an inner while statement to handle the guesswork. It repeatedly prompts for a guess, converts the pressed key’s Unicode character value to a binary integer value from 0 through 9, and determines whether the user has guessed correctly or not. A suitable message is output. Users who guess correctly are given the chance to play a new game by pressing n, or to quit the application by pressing q.
An interesting part of the source code is while (System.in.read() != 'n');. I use this statement to flush the line separator character(s) (e.g., rn on Windows) from the operating system’s keyboard buffer. Without this, you would see multiple prompts because each separator character will be interpreted as an attempt to enter a value from 0 through 9 (or n or q). If you’re running Java on an older version of Mac OS, you’ll probably have to replace n with r, which is the Mac’s line separator. No changes are necessary when running on Linux or Unix, whose line separator is n.
Compile Listing 1 as follows:
javac Guess.javaThen run the application:
java GuessBelow is the output from a sample run:
I'm thinking of a number between 0 and 9.
Enter your guess number between 0 and 9.
5
Your guess is too high.
Enter your guess number between 0 and 9.
2
Your guess is too low.
Enter your guess number between 0 and 9.
3
Your guess is too low.
Enter your guess number between 0 and 9.
4
Congratulations! You guessed correctly.
Press n for new game or q to quit.
q
Note that you could make this code portable by working with the standard class library’s System class, which offers access to the line.separator property. This task could be a good exercise for developers who are comfortable with Java’s classes and methods.
Using the Java Shell editor
You might want to create or edit this application using the jshell utility. You’ll find the /edit command helpful for this purpose. When you enter /edit, jshell displays an edit window with Cancel, Accept, and Edit buttons:
- Cancel: Cancel the editor without saving changes.
- Accept: Save changes without leaving the editor. Java Shell displays a modification message at the prompt when changes are saved.
- Exit: Save changes and leave the editor. Java shell displays a modification message at the prompt when changes are saved.
Copy Listing 1 into and exit the editor. Then enter Guess.main(null) at the jshell> prompt to run the application. When you finish with the application, enter q and you’ll be returned to the jshell> prompt.
Conclusion
Along with Java expressions and operators, statements are the workhorses of a Java application. Mastering these three basic language features gives you a solid foundation for exploring more advanced aspects of programming with Java. In this article, you’ve learned about Java statements and how to use them in your Java programs.
Retrieval-augmented generation refined and reinforced 23 Jul 2024, 10:30 am
In the era of generative AI, large language models (LLMs) are revolutionizing the way information is processed and questions are answered across various industries. However, these models come with their own set of challenges, such as generating content that may not be accurate (hallucination), relying on stale knowledge, and employing opaquely intricate reasoning paths that are often not traceable.
To tackle these issues, retrieval-augmented generation (RAG) has emerged as an innovative approach that pairs the inherent abilities of LLMs with the rich, ever-updating content from external databases. This blend not only amplifies model performance in delivering precise and dependable responses but also enhances their capacity for coherent explanations, accountability, and adaptability, especially in tasks that are intensive in knowledge demands. RAG’s adaptability allows for the constant refreshment of information it draws upon, thus ensuring that responses are up-to-date and that they incorporate domain-specific insights, directly addressing the crux of LLM limitations.
RAG strengthens the application of generative AI across business segments and use cases throughout the enterprise, for example code generation, customer service, product documentation, engineering support, and internal knowledge management. It astutely addresses one of the primary challenges in applying LLMs to enterprise needs: providing relevant, accurate knowledge from vast enterprise databases to the models without the need to train or fine-tune LLMs. By integrating domain-specific data, RAG ensures that the answers of generative AI models are not only richly informed but also precisely tailored to the context at hand. It also allows enterprises to keep control over their confidential or secret data and, eventually, develop adaptable, controllable, and transparent generative AI applications.
This aligns well with our goal to shape a world enhanced by AI at appliedAI Initiative, as we constantly emphasize leveraging generative AI as a constructive tool rather than just thrusting it into the market. By focusing on real value creation, RAG feeds into this ethos, ensuring enhanced accuracy, reliability, controllability, reference-backed information, and a comprehensive application of generative AI that encourages users to embrace its full potential, in a way that is both informed and innovative.
RAG options: Choosing between customizability and convenience
As enterprises delve into RAG, they are confronted with the pivotal make-or-buy decision to realize applications. Should you opt for the ease of readily available products or the tailor-made flexibility of a custom solution? The RAG-specific market offerings are already rich with giants like OpenAI’s Knowledge Retrieval Assistant, Azure AI Search, Google Vertex AI Search, and Knowledge Bases for Amazon Bedrock, which cater to a broad set of needs with the convenience of out-of-the-box functionality embedded in an end-to-end service. Alongside these, Nvidia NeMo Retriever or Deepset Cloud offer a path somewhere in the middle — robust and feature-rich, yet capable of customization. Alternatively, organizations can embark on creating solutions from scratch or modify existing open-source frameworks such as LangChain, LlamaIndex, or Haystack — a route that, while more labor-intensive, promises a product finely tuned to specific requirements.
The dichotomy between convenience and customizability is profound and consequential, resulting in common trade-offs for make-or-buy decisions. Within generative AI, the two aspects, transparency and controllability, require additional consideration due to certain inherent properties that introduce risks such as hallucinations and false facts in applications.
Prebuilt solutions and products offer an alluring plug-and-play simplicity that can accelerate deployment and reduce technical complexities. They are a tempting proposition for those wanting to quickly leap into the RAG space. However, one-size-fits-all products often fall short in catering to the nuanced intricacies inherent in individual domains or companies — be it the subtleties of community-specific background knowledge, conventions, and contextual expectations, or the standards used to judge the quality of retrieval results.
Open-source frameworks stand out in their unparalleled flexibility, giving developers the freedom to weave in advanced features, like company-internal knowledge graph ontology retrievers, or to adjust and calibrate the tools to optimize performance or ensure transparency and explainability, as well as align the system with specialized business objectives.
Hence, the choice between convenience and customizability is not just a matter of preference but a strategic decision that could define the trajectory of an enterprise’s RAG capabilities.
RAG roadblocks: Challenges along the RAG industrialization journey
The journey to industrializing RAG solutions presents several significant challenges along the RAG pipeline. These need to be tackled for them to be effectively deployed in real-world scenarios. Basically, a RAG pipeline consists of four standard stages — pre-retrieval, retrieval, augmentation and generation, and evaluation. Each of these stages presents certain challenges that require specific design decisions, components, and configurations.
At the outset, determining the optimal chunking size and strategy proves to be a nontrivial task, particularly when faced with the cold-start problem, where no initial evaluation data set is available to guide these decisions. A foundational requirement for RAG to function effectively is the quality of document embeddings. Guaranteeing the robustness of these embeddings from inception is critical, yet it poses a substantial obstacle, just like the detection and mitigation of noise and inconsistencies within the source documents. Optimally sourcing contextually relevant documents is another Gordian knot to untangle, especially when naive vector search algorithms fail to deliver desired contexts, and multifaceted retrieval becomes necessary for complex or nuanced queries.
The generation of accurate and reliable responses from retrieved data introduces additional complexities. For one, the RAG system needs to dynamically determine the right number (top-K) of relevant documents to cater to the diversity of questions it might encounter — a problem that does not have a universal solution. Secondly, beyond retrieval, ensuring that the generated responses remain faithfully grounded in the sourced information is paramount to maintaining the integrity and usefulness of the output.
Lastly, despite the sophistication of RAG systems, the potential for residual errors and biases to infiltrate the responses remains a pertinent concern. Addressing these biases requires diligent attention to both the design of the algorithms and the curation of the underlying data sets to prevent the perpetuation of such issues in the system’s responses.
RAG futures: Charting the course to RAG-enhanced intelligent agents
Recent discourse within both academic and industrial circles has been animated by efforts to enhance RAG systems, leading to the advent of what is now referred to as advanced or modular RAG. These evolved systems incorporate an array of sophisticated techniques geared towards amplifying their effectiveness. A notable advancement is the integration of metadata filtering and scoping, whereby ancillary information, such as dates or chapter summaries, is encoded within textual chunks. This not only refines the retriever’s ability to navigate expansive document corpora but also bolsters the congruity assessment against the metadata — essentially optimizing the matching process. Moreover, advanced RAG implementations have embraced hybrid search paradigms, dynamically selecting among keyword, semantic, and vector-based searches to align with the nature of user inquiries and the idiosyncratic characteristics of the available data.
In the realm of query processing, a crucial innovation is the query router, which discerns the most pertinent downstream task and designates the optimal repository from which to source information. In terms of query engineering, an arsenal of techniques is employed to forge a closer bond between user input and document content, sometimes utilizing LLMs to craft supplemental contexts, quotations, critiques, or hypothetical answers that enhance document-matching precision. These systems have even progressed to adaptive retrieval strategies, where the LLMs preemptively pinpoint optimal moments and content to consult, ensuring relevance and temporal timeliness in the information retrieval stage.
Furthermore, sophisticated reasoning methods, such as the chain of thought or tree of thought techniques, have also been integrated into RAG frameworks. Chain of thought (CoT) simulates a thought process by generating a series of intermediate steps or reasoning, whereas tree of thought (ToT) builds up a branching structure of ideas and evaluates different options to attain deliberate and accurate conclusions. Cutting-edge approaches like RAT (retrieval-augmented thoughts) merge the concepts of RAG with CoT, enhancing the system’s ability to retrieve relevant information and logically reason. Furthermore, RAGAR (RAG-augmented reasoning) represents an even more advanced step, incorporating both CoT and ToT alongside a series of self-verification steps against the most current external web resources. Additionally, RAGAR extends its capabilities to handle multimodal inputs, processing both visual and textual information simultaneously. This further elevates RAG systems to be highly reliable and credible frameworks for the retrieval and synthesis of information.
Unfolding developments such as RAT and RAGAR will further harmonize advanced information retrieval techniques and the deep reasoning offered by sophisticated LLMs, further establishing RAG as a cornerstone of next-generation enterprise intelligence solutions. The precision and factuality of refined information retrieval, combined with the the analytical, reasoning, and agentic prowess of LLMs, heralds an era of intelligent agents tailored for complex enterprise applications, from decision-making to strategic planning. RAG-enhanced, these agents will be equipped to navigate the nuanced demands of strategic enterprise contexts.
Paul Yu-Chun Chang is Senior AI Expert, Foundation Models (Large Language Models) at appliedAI Initiative GmbH. Bernhard Pflugfelder is Head of Innovation Lab (GenAI) at appliedAI Initiative GmbH.
—
Generative AI Insights provides a venue for technology leaders—including vendors and other outside contributors—to explore and discuss the challenges and opportunities of generative artificial intelligence. The selection is wide-ranging, from technology deep dives to case studies to expert opinion, but also subjective, based on our judgment of which topics and treatments will best serve InfoWorld’s technically sophisticated audience. InfoWorld does not accept marketing collateral for publication and reserves the right to edit all contributed content. Contact doug_dineley@foundryco.com.
IBM adds Mistral Large language model to watsonx.ai 23 Jul 2024, 1:17 am
IBM has made the Mistral Large advanced large language model (LLM) available on IBM’s watsonx.ai enterprise tools platform for AI developers, expanding the collection of models accessible on watsonx.ai.
With Mistral AI, watsonx.ai users gain a generative AI model optimized to handle complex enterprise tasks that require advanced reasoning and multilingual capabilities, IBM said. These include retrieval-augmented generation (RAG) specialization, to support longer chat interactions and large document processing; function calling, for connections to external tools such as user-defined functions; and coding proficiency, for generating and commenting on code, with capability to output results in the JSON format. Also offered are “responsible AI,” with built-in guardrail features, and support for multilingual capabilities, with fluency in English, French, German, Spanish, and Italian.
Mistral Large initially will be available as SaaS, IBM said on July 18. Mistral Large joins a collection of models accessible on watson.ai, including the IBM Granite family of foundation models. Mistral AI and IBM continue to foster innovation and collaboration by providing enterprises with access to a mix of open source and commercial models as well as smaller models on watsonx.ai that prioritize data control, IBM said. IBM will provide customers with protection for Mistral Large via a capped intellectual property indemnity, thus making it the first third-party foundation model that gets IBM indemnification. With Mistral Large now on the watsonx platform, enterprises benefit from additional enterprise-ready products, including data store, prompt lab, model tuning, production monitoring, and governance capabilities, IBM said.
Page processed in 1.799 seconds.
Powered by SimplePie 1.3.1, Build 20121030095402. Run the SimplePie Compatibility Test. SimplePie is © 2004–2024, Ryan Parman and Geoffrey Sneddon, and licensed under the BSD License.